My awesome sister gives the best birthday presents. This year she gave me a bunch of jars, some orange paint, a roll of masking tape, foam brushes and some flameless candles. She also gave me the instructions for a fun halloween jack-o-lantern craft to do with my kids.
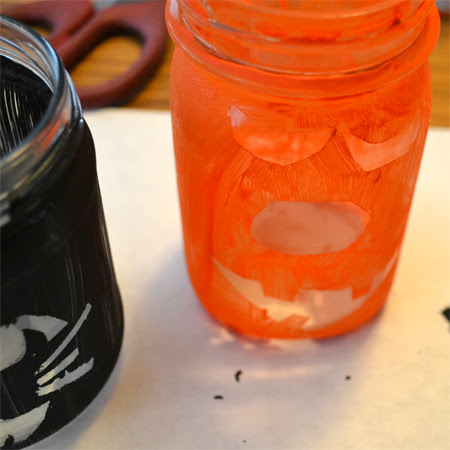
I'm always amazed by the creativity of my children. I broke out the materials to make "jar-o-lanterns" and Buddy asked for green paint because he wanted to make an ugly-doll lantern.
Jellybean asked for purple (but she was sadly out of luck.) She decided to stick with the jack-o-lantern theme since orange is her favorite color. She was very specific about the shapes she wanted for the face. Inspired by Buddy's thinking, I went with black paint for a cat lantern.
A couple of tips on this cute craft: First, I found that putting the paint on thickly and evenly does make the end result nicer. Not always possible when small children are doing the painting though. Also, be very careful when peeling up the masking tape. The glass jar is very smooth, so the paint has a tendency of coming up with the tape.
They are so cute on my table with the lights inside. Both of the kids were thrilled with their lanterns.
Have a Happy Day!
~MJ
Showing posts with label decor. Show all posts
Tuesday, October 15, 2013
Tuesday, March 19, 2013
Bunny Paper Cut
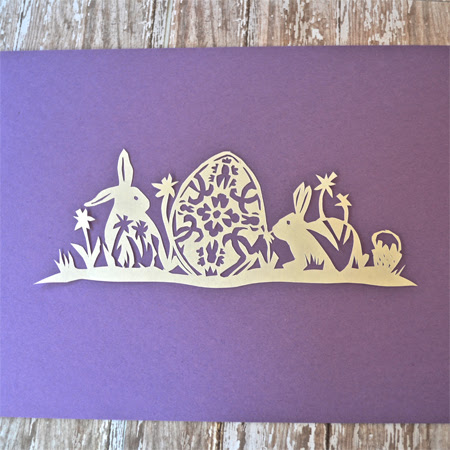
Looking for more Easter decor to put up around the house, I decided to design another paper cut for the season. You might remember that I designed this paper cut for Valentine's. I've mentioned before that I'm definitely an amateur when it comes to the art of paper cutting, but I still enjoy it. The bunny design I put together has a couple of flaws, but I still like the way it turned out.
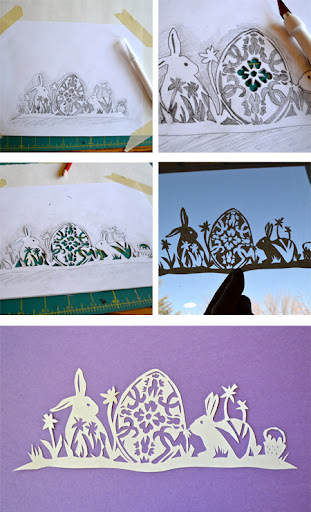
The above shows my cutting process. There are more detailed photos of the process on my Valentine's paper cut post. The pattern needs a little tweaking and I modified it a little as I went along, but I still thought I'd provide my sketch in case you'd like to try it out yourself.Download the Bunny Paper Cut PDF here:
Bunny Paper Cut
Easter is coming up so quickly and I feel very unprepared. Jellybean's birthday is in a week and I keep forgetting that I need to get our Easter plans figured out for just another week after that. Then, of course, there's the whole birth of our third child looming. I still have about 6 weeks to go. I told D today that I need a baby-cation. I'm thinking that involves me, a hotel room, room service, movies and some serious alone time. I doubt that's possible, but it's nice to dream about.
Have a Happy Day!
~MJ
Labels:
Art,
bunny,
decor,
decorating,
diy,
easter,
home,
Knife,
paper cut,
pattern,
scherenschnitte,
Spring
Thursday, January 24, 2013
Paper Cut Valentine
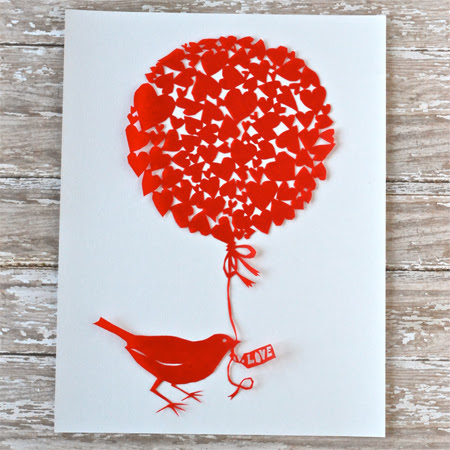
I absolutely love the art of paper cutting (Scherenschnitte). There are many true artists out there that create amazing, intricate work. I took a class on that topic a couple of years ago and have been trying my hand at it now and again ever since.
Because I'm not much of an artist and because I'm such an amateur at paper cutting, I shamelessly stole a beautiful paper cut pattern from the internet (here. Wish I had a true photo credit for it.) and then simplified it a little so that I could actually make it work for me. I added some of my own touches as well.
Here's a few tips I picked up in my class if you'd like to dabble a little in paper cutting yourself.
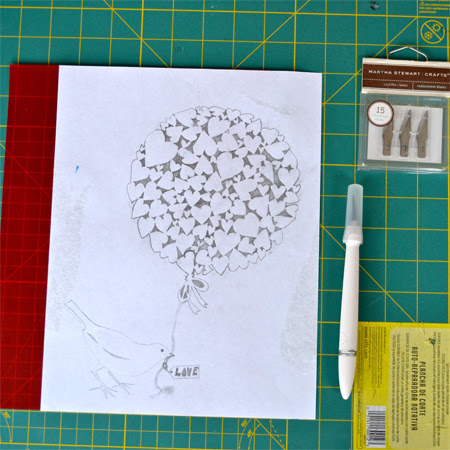
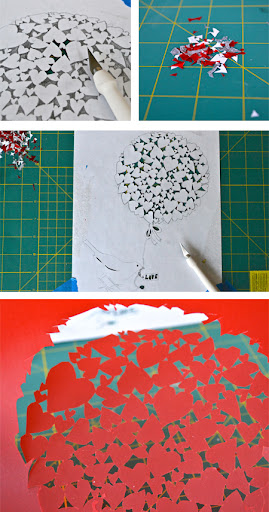
First, you'll need a pattern to work from. (at least I do) I sketched my pattern onto a piece of printer paper. Then you'll need a nice sheet of paper to cut the pattern onto. I decided to go with a sheet of red vellum. I figured that it isn't the easiest to tear, but it is still relatively thin. Whatever paper you choose, make sure that it is the same color all the way through.
Next, you'll want a few tools: A nice craft knife, (this one from Martha Stewart is awesome), a new sharp blade, and a self healing mat to cut on. (A smaller mat than mine is preferable so that you can turn it this way and that with more ease.)
Start cutting the small details on the interior of your pattern. You'll want the excess paper, it makes everything more stable. Go slowly and make small cuts. Once you are done with the small details, move onto the bigger details and then cut the main outline.
As you can see, my cuts are far from perfect, but oh is it satisfying seeing the end result of your hard work. It's almost magical when you carefully separate the paper cut from the outside paper. One last note: Remember to cut the paper and not yourself. That's always good advice.
Have a Happy Day!
~MJ
Because I'm not much of an artist and because I'm such an amateur at paper cutting, I shamelessly stole a beautiful paper cut pattern from the internet (here. Wish I had a true photo credit for it.) and then simplified it a little so that I could actually make it work for me. I added some of my own touches as well.
Here's a few tips I picked up in my class if you'd like to dabble a little in paper cutting yourself.
First, you'll need a pattern to work from. (at least I do) I sketched my pattern onto a piece of printer paper. Then you'll need a nice sheet of paper to cut the pattern onto. I decided to go with a sheet of red vellum. I figured that it isn't the easiest to tear, but it is still relatively thin. Whatever paper you choose, make sure that it is the same color all the way through.
Next, you'll want a few tools: A nice craft knife, (this one from Martha Stewart is awesome), a new sharp blade, and a self healing mat to cut on. (A smaller mat than mine is preferable so that you can turn it this way and that with more ease.)
Start cutting the small details on the interior of your pattern. You'll want the excess paper, it makes everything more stable. Go slowly and make small cuts. Once you are done with the small details, move onto the bigger details and then cut the main outline.
As you can see, my cuts are far from perfect, but oh is it satisfying seeing the end result of your hard work. It's almost magical when you carefully separate the paper cut from the outside paper. One last note: Remember to cut the paper and not yourself. That's always good advice.
Have a Happy Day!
~MJ
Sharing on:
Labels:
Art,
balloon,
bird,
decor,
diy,
heart,
paper cut,
scherenschnitte,
tutorial,
valentine,
valentine's day
Tuesday, December 11, 2012
Winter Porch Decor Part 2
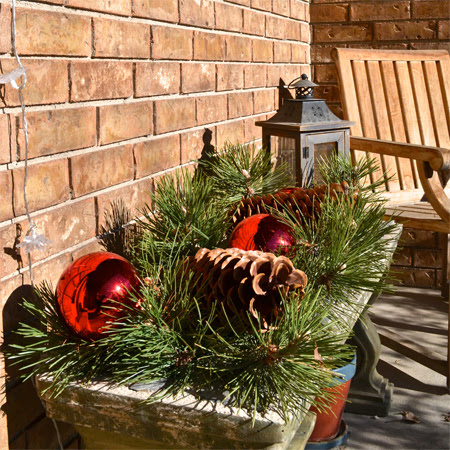
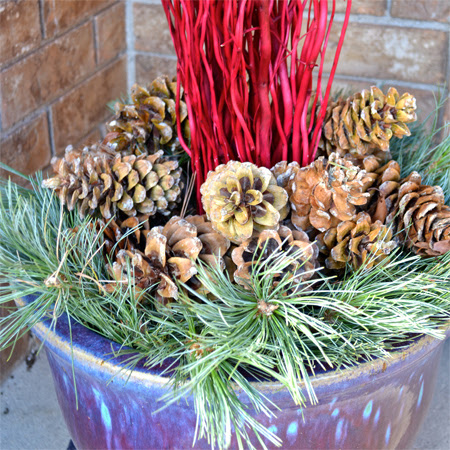
I'm still adding some decorative touches all around my house. My front porch has been looking pretty bare, so I thought it would be nice to add more greenery. I had already created an arrangement using a large planter:
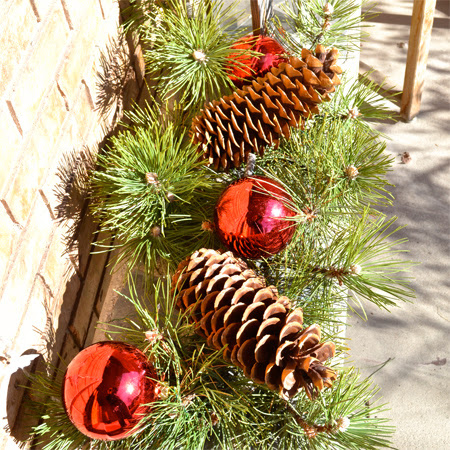
So, I decided to continue on with that theme. I found some great pine cones at Hobby Lobby, then later found some that were equally as nice at a local garden store for a fraction of the price. Unfortunately, I had already purchased the pine cones from Hobby Lobby. I guess there's always next year, if I find that I need more. I also borrowed a few more pine boughs from my neighbor's tree (thanks neighbor).
A few large, red ornaments were the finishing touch. (look you can see my reflection in one of them) I used some floral wire to wire it all together. We get some unbelievable wind, so I also wired the arrangement to the bench. Just a simple, but lovely little touch. It doesn't take much to make me feel proud of myself.
Have a Happy Day!
~MJ
So, I decided to continue on with that theme. I found some great pine cones at Hobby Lobby, then later found some that were equally as nice at a local garden store for a fraction of the price. Unfortunately, I had already purchased the pine cones from Hobby Lobby. I guess there's always next year, if I find that I need more. I also borrowed a few more pine boughs from my neighbor's tree (thanks neighbor).
A few large, red ornaments were the finishing touch. (look you can see my reflection in one of them) I used some floral wire to wire it all together. We get some unbelievable wind, so I also wired the arrangement to the bench. Just a simple, but lovely little touch. It doesn't take much to make me feel proud of myself.
Have a Happy Day!
~MJ
Labels:
Christmas,
decor,
decorating,
front porch,
Holiday,
ornaments,
pine,
pine cones,
Winter
Thursday, December 6, 2012
Another Holiday Wreath
You may be wondering if I spent any time with my children this week. I'm pretty sure that's who I spent the majority of my time with, though to look at this blog this week, you may not know it.
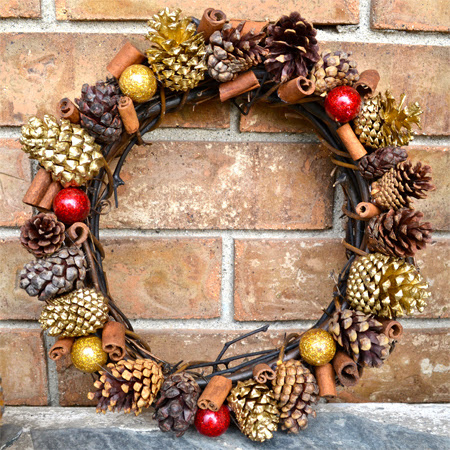
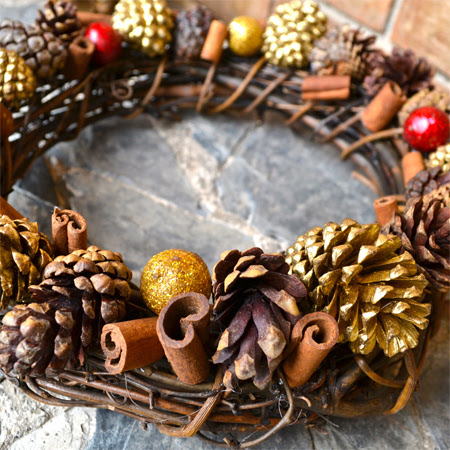
I've just been in the mood to make things lately and have felt the need to take pictures and share (of course). So, here's the last project of the week. A really simple holiday wreath; completed during nap time yesterday. I had a grape vine wreath that has been sitting around since last year just beckoning to me. I also had a bag of holiday "doo-dads"(pine cones, small shiny balls and cinnamon sticks) that has been sitting around. I purchased it on sale last year as well. So, I sat down with my trusty glue gun and went to work.
This sweet little wreath has found its home on my mantel. As an added bonus, the cinnamon sticks still have some scent left. Weird how a quick project like this can lend such a sense of accomplishment. It's the little things I suppose.
Have a Happy Day!
~MJ
I've just been in the mood to make things lately and have felt the need to take pictures and share (of course). So, here's the last project of the week. A really simple holiday wreath; completed during nap time yesterday. I had a grape vine wreath that has been sitting around since last year just beckoning to me. I also had a bag of holiday "doo-dads"(pine cones, small shiny balls and cinnamon sticks) that has been sitting around. I purchased it on sale last year as well. So, I sat down with my trusty glue gun and went to work.
This sweet little wreath has found its home on my mantel. As an added bonus, the cinnamon sticks still have some scent left. Weird how a quick project like this can lend such a sense of accomplishment. It's the little things I suppose.
Have a Happy Day!
~MJ
Sharing on:
Tuesday, December 4, 2012
Nap Time Craft: Felt Shingle Tree
I saw a great tutorial for this cute Christmas craft on Pinterest and lamented to D the fact that Hobby Lobby isn't open until late at night. I really wanted to run out and buy the materials right then, only it was 10 PM on a Sunday night. So, I had to do the sensible thing and make the trip on Monday morning with Jellybean. I spent nap time working on my little tree. It is now sitting on my mantle.
I had needed something tall and it fits the bill perfectly, plus it was very easy to put together. Cutting the felt circles was a bit time consuming, but other than that it was as easy as can be. Definitely worth the effort. I used 4.5 sheets of craft felt for my 18" tree. Also, I traced the end of a paper towel tube for my circles.
You can find the full tutorial at Scissor Variations.
Have a Happy Day!
~MJ
Sharing on:
Wednesday, November 21, 2012
Porch in Transition: Winter Decor
Yesterday, between errands, taking care of the kids, cleaning the oven, doing laundry, making dinner, and baking rolls (oh, and all of the other daily minutiae) I managed to put together a new porch decoration. I'm pretty proud of myself, too. Okay, so I know I complained about people who rush by Thanksgiving in their hurry to get on to Christmas. Well, while this leans towards Christmasy, I'm going to say it's just a winter porch in transition.
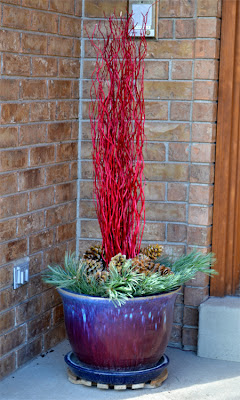
My mom pointed out an article to me in a recent Better Homes and Gardens. The article highlighted some great floral porch arrangements. There was one in particular that caught my eye. The center piece was a bunch of red stick dogwood branches surrounded by pine. It was very simple and eye catching. Going from memory, I visited a local home decor center and looked for some branches that would work. I found some! Not dogwood, but a lovely shade of red nonetheless.
We already had a big pot sitting on the porch courtesy of the previous homeowners. We also had some pesky pine trees overhanging our fence courtesy of the neighbors. I snipped a few of those branches. The same pine trees love to drop large pine cones into our play area, so I collected those as well.
I dug down in the dirt, placed the branches and then stabilized them a little with some rocks. Then I cut apart the pine branches and stuck them in the dirt surrounding the red branches.
Finally, I laid the pine cones on top of the pine branches to add a little interest. I love the end result even if my husband's first comment was, "looks like a miniature Chihuly."
The other side of the porch is still strongly leaning towards fall and Thanksgiving, I'll start to transition that next week. No rush.
Have a Happy Day!
~MJ
My mom pointed out an article to me in a recent Better Homes and Gardens. The article highlighted some great floral porch arrangements. There was one in particular that caught my eye. The center piece was a bunch of red stick dogwood branches surrounded by pine. It was very simple and eye catching. Going from memory, I visited a local home decor center and looked for some branches that would work. I found some! Not dogwood, but a lovely shade of red nonetheless.
We already had a big pot sitting on the porch courtesy of the previous homeowners. We also had some pesky pine trees overhanging our fence courtesy of the neighbors. I snipped a few of those branches. The same pine trees love to drop large pine cones into our play area, so I collected those as well.
I dug down in the dirt, placed the branches and then stabilized them a little with some rocks. Then I cut apart the pine branches and stuck them in the dirt surrounding the red branches.
Finally, I laid the pine cones on top of the pine branches to add a little interest. I love the end result even if my husband's first comment was, "looks like a miniature Chihuly."
The other side of the porch is still strongly leaning towards fall and Thanksgiving, I'll start to transition that next week. No rush.
Have a Happy Day!
~MJ
Tuesday, November 20, 2012
Ridiculously Easy Fall Wreath
I realize that most people in the blog world have already completely skipped over Thanksgiving and are moving onto Christmas. But you know what? It's still a few days before Thanksgiving and I'm not ready to move on just yet.
Well, it's a good thing that I'm not ready to move on. It makes me feel justified in pulling out a Fall wreath idea from last year and posting it in lieu of anything more exciting.
Last year, I needed some quick mantel decor, so I purchased a bag of pine cones and whatever those pumpkin things are, cut out a cardboard form and then hot glued the whole thing together. How's that for a lazy wreath? The best part is that I purchased the pinecones so close to Thanksgiving that they were 50% off. So the wreath cost me less than $5. Not bad for DIY decor that will be pulled out every year.
On another note, I fear that my blogging will not be as consistent over the next little while. My ultra favorite pregnancy symptom has reared its ugly head: Restless Leg Syndrome. While my morning sickness seems to be diminishing, my restless legs are making my nights pretty difficult. I wake up in the mornings feeling like I've been running all night long. If only I were getting some health benefit... Here's to hoping that it will pass quickly and not last for the rest of the pregnancy.
Have a Happy Day!
~MJ
Well, it's a good thing that I'm not ready to move on. It makes me feel justified in pulling out a Fall wreath idea from last year and posting it in lieu of anything more exciting.
Last year, I needed some quick mantel decor, so I purchased a bag of pine cones and whatever those pumpkin things are, cut out a cardboard form and then hot glued the whole thing together. How's that for a lazy wreath? The best part is that I purchased the pinecones so close to Thanksgiving that they were 50% off. So the wreath cost me less than $5. Not bad for DIY decor that will be pulled out every year.
On another note, I fear that my blogging will not be as consistent over the next little while. My ultra favorite pregnancy symptom has reared its ugly head: Restless Leg Syndrome. While my morning sickness seems to be diminishing, my restless legs are making my nights pretty difficult. I wake up in the mornings feeling like I've been running all night long. If only I were getting some health benefit... Here's to hoping that it will pass quickly and not last for the rest of the pregnancy.
Have a Happy Day!
~MJ
Wednesday, October 24, 2012
Simple Craft: Halloween Silhouettes
With 7 days left before the holiday, I'm still making some additions to my Halloween decor. I've been wanting to add a little more decoration to our mantel, so I thought I'd create some Halloween silhouettes. It turned out to be a really simple and fun craft. It was also a great project to do during nap time.
Materials:
Glass frames (I found mine for $5 a piece at Michael's)
Textured fabric like burlap or cross stitching material.
Hot glue gun
Sharpie
Printed image to copy for the silhouette.
I found a couple of images online that I liked and printed them off. There are tons of Halloween silhouettes available online.
I took the glass out of my frames, positioned it over the silhouette and then just copied the image straight to the glass using my sharpie.
When I was done copying the image, I hot glued the fabric to the backing in the frame, then laid the glass on top of the fabric. At that point, I could see if there were any spots I had missed and I filled them in.
I actually left the sharpied image facing out. It gives the impression of it floating away from the background a bit.
I really like the way they turned out. They are super simple, but give a fun Halloween flair to the mantel.
It will be fun to bring them out again year after year.
Have a Happy Day!
~MJ
Materials:
Glass frames (I found mine for $5 a piece at Michael's)
Textured fabric like burlap or cross stitching material.
Hot glue gun
Sharpie
Printed image to copy for the silhouette.
I found a couple of images online that I liked and printed them off. There are tons of Halloween silhouettes available online.
I took the glass out of my frames, positioned it over the silhouette and then just copied the image straight to the glass using my sharpie.
When I was done copying the image, I hot glued the fabric to the backing in the frame, then laid the glass on top of the fabric. At that point, I could see if there were any spots I had missed and I filled them in.
I actually left the sharpied image facing out. It gives the impression of it floating away from the background a bit.
I really like the way they turned out. They are super simple, but give a fun Halloween flair to the mantel.
It will be fun to bring them out again year after year.
Have a Happy Day!
~MJ
Monday, October 15, 2012
Painting Spider Webs
I've seen some great glass painting projects on the web lately. After a little research on how it is done, I decided that I wanted to give a spooky update to the lantern I bought last Spring. I was going to be more ambitious and do our front windows, but I'm afraid that will have to wait until next year.
My poor little air plant bit the dust a few weeks ago. Turns out, that if you go a couple of days too long and forget to water it, it will shrivel up and die. Sad.
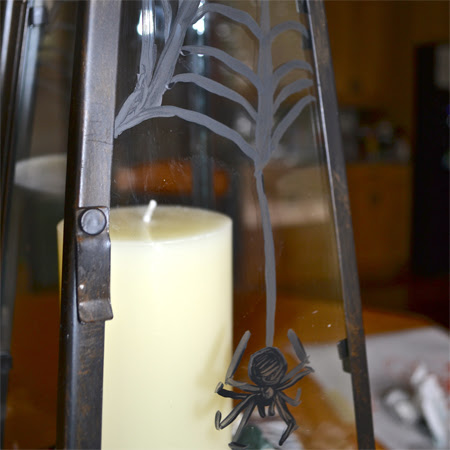
First, I cleaned the glass on the lantern. Then I got out some black, water-based, acrylic paint and a thin Golden Taklon brush and set to work. Half way through my first web, I decided that I didn't like how it was going. So, I just used some glass cleaner and wiped the paint right off of the glass. Apparently, when the season is over, all that I'll need to do is soak the paint with water and then use a credit card to scrape it from the glass. I hope it works as well as it is supposed to.
It was a fun addition to our Halloween decor. I'm almost thinking of going overboard and painting our mirrors as well...
Have a Happy Day!
~MJ
My poor little air plant bit the dust a few weeks ago. Turns out, that if you go a couple of days too long and forget to water it, it will shrivel up and die. Sad.
First, I cleaned the glass on the lantern. Then I got out some black, water-based, acrylic paint and a thin Golden Taklon brush and set to work. Half way through my first web, I decided that I didn't like how it was going. So, I just used some glass cleaner and wiped the paint right off of the glass. Apparently, when the season is over, all that I'll need to do is soak the paint with water and then use a credit card to scrape it from the glass. I hope it works as well as it is supposed to.
It was a fun addition to our Halloween decor. I'm almost thinking of going overboard and painting our mirrors as well...
Have a Happy Day!
~MJ
Sharing On:
Labels:
Autumn,
decor,
decorating,
Fall,
glass,
Halloween,
painting,
Spider webs
Monday, September 24, 2012
Tangled Weave Pumpkin Basket
Inspiration struck over the weekend. I've been slowly adding to my Autumn decor, but I haven't wanted to actually start full on decorating for Fall. Well, apparently I'm really gearing up, because I had an idea for an Autumn project that just couldn't wait. I put my daughter's halloween costume on hold (yet again) in favor of creating a pumpkin basket to add to my decor.
I wanted the actual shape of a pumpkin, so I bought a small pie pumpkin for my form. I cut it in half and pulled out the pulp and seeds (mmm roasted pumpkin seeds. I'll post about that tomorrow).
Then I took over the majority of the dining room table for the entire weekend and went to work. I covered my work surface in wax paper and I wrapped each half of the pumpkin in plastic wrap. Then I began wrapping each half in yarn, smoothing Elmer's glue over the yarn as I worked. When I was done with that, I actually mixed some glue with a little water in a bowl and, using a brush, smoothed on a little more glue here and there, where I thought the basket might need a little more strength.
It took quite a while for it to dry. Even with a little help from my blow dryer, it took this the afternoon and over night for it to dry. Once the yarn was stiff, I pulled the plastic wrap from the pumpkins and peeled it carefully away from the yarn. There was some dried glue here and there that required some clean up, but all in all, it worked really well.
Plus, I think it turned out pretty cute. I'm thinking of adding a couple of leaves to the top of it, but haven't found what I like yet. I think this will be a fun addition to my mantel decor for Fall.
Have a Happy Day!
~MJ
I wanted the actual shape of a pumpkin, so I bought a small pie pumpkin for my form. I cut it in half and pulled out the pulp and seeds (mmm roasted pumpkin seeds. I'll post about that tomorrow).
Then I took over the majority of the dining room table for the entire weekend and went to work. I covered my work surface in wax paper and I wrapped each half of the pumpkin in plastic wrap. Then I began wrapping each half in yarn, smoothing Elmer's glue over the yarn as I worked. When I was done with that, I actually mixed some glue with a little water in a bowl and, using a brush, smoothed on a little more glue here and there, where I thought the basket might need a little more strength.
It took quite a while for it to dry. Even with a little help from my blow dryer, it took this the afternoon and over night for it to dry. Once the yarn was stiff, I pulled the plastic wrap from the pumpkins and peeled it carefully away from the yarn. There was some dried glue here and there that required some clean up, but all in all, it worked really well.
Plus, I think it turned out pretty cute. I'm thinking of adding a couple of leaves to the top of it, but haven't found what I like yet. I think this will be a fun addition to my mantel decor for Fall.
Have a Happy Day!
~MJ
Sharing On:
Tuesday, September 18, 2012
Painted Leaves
I guess I'm continuing on the leaf theme for the week. I posted a while ago about pressing leaves from my Forest Pansy Red Bud tree. That tree has such beautifully shaped leaves, it was difficult to resist.
Now that the weather is cooling, I've been able to snatch up a few leaves that have begun changing color. So, of course, I pressed those as well. I have some more "valentiney" plans for some of the heart-shaped leaves, but since I love the look of pressed leaves around the house in the Fall, I thought I'd do something different with a couple of them.
I had some paint around the house and some fine paint brushes, so I spent about five minutes and experimented with leaf painting.
I really thought I was ruining the leaf above, but now I think I like the end result. Most of the time, it's best not to tamper with the beauty of nature.
Some of these leaves were too beautiful to touch. I'm thinking of framing the above collection just as it is for my Fall decor. I can't wait to press more of the Fall leaves as they continue to change.
Have a Happy Day!
~MJ
Now that the weather is cooling, I've been able to snatch up a few leaves that have begun changing color. So, of course, I pressed those as well. I have some more "valentiney" plans for some of the heart-shaped leaves, but since I love the look of pressed leaves around the house in the Fall, I thought I'd do something different with a couple of them.
I had some paint around the house and some fine paint brushes, so I spent about five minutes and experimented with leaf painting.
I really thought I was ruining the leaf above, but now I think I like the end result. Most of the time, it's best not to tamper with the beauty of nature.
Some of these leaves were too beautiful to touch. I'm thinking of framing the above collection just as it is for my Fall decor. I can't wait to press more of the Fall leaves as they continue to change.
Have a Happy Day!
~MJ
Sharing on:
Tuesday, May 15, 2012
Simple Air Plant Terrarium and Mantel
I've been working on putting some decorative touches into our new home. For a while now, we've had a blank glass coffee table that I just couldn't decide what to do with. I saw an air plant terrarium for sale recently that really inspired me. The terrarium for sale was too rich for my blood, but I thought I could pull something together that had a similar feel. So, this is what I came up with.
Any lantern would do, but I really liked the look of this lantern that I purchased from a local boutique. I threw in some decorative rocks and spent some time picking out a cute little air plant to put inside.
I learned from the garden store that the grayer the air plant is, the more light it requires. The one I chose is darker green and should need bright, indirect light. The fun thing about the air plant is that it doesn't require soil. This little one will need to be dunked in water a couple of times a week and that's it.
I've also been working on the mantel in this room. I added a few things to it in the last week as well.
If you are wondering what was going on in the corner of the room I didn't include in the above pictures...
Yeah, that's what was happening there.
Have a Happy Day!
~MJ
This post is participating in:

Any lantern would do, but I really liked the look of this lantern that I purchased from a local boutique. I threw in some decorative rocks and spent some time picking out a cute little air plant to put inside.
I learned from the garden store that the grayer the air plant is, the more light it requires. The one I chose is darker green and should need bright, indirect light. The fun thing about the air plant is that it doesn't require soil. This little one will need to be dunked in water a couple of times a week and that's it.
I've also been working on the mantel in this room. I added a few things to it in the last week as well.
If you are wondering what was going on in the corner of the room I didn't include in the above pictures...
Yeah, that's what was happening there.
Have a Happy Day!
~MJ
This post is participating in:

Labels:
air plant,
around the house,
decor,
diy,
home decor,
interior design,
lantern,
planter,
plants,
project,
simple,
terrarium
Subscribe to:
Posts (Atom)