Jellybean saw a fairy garden at a local nursery last week and fell in love. So, here is the result of today's endeavor. A little fairy house is next on our project list.
Have a Happy Day!
~MJ
Showing posts with label diy. Show all posts
Showing posts with label diy. Show all posts
Monday, April 14, 2014
Thursday, February 13, 2014
Happy Heart Day!
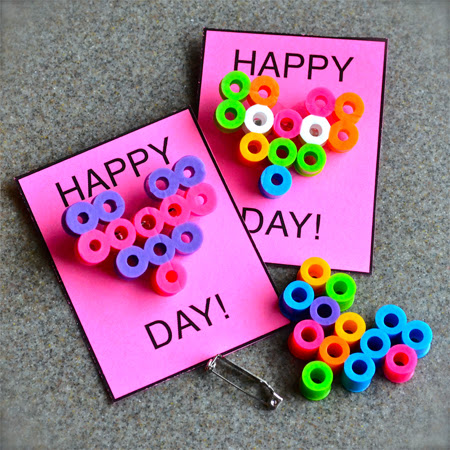
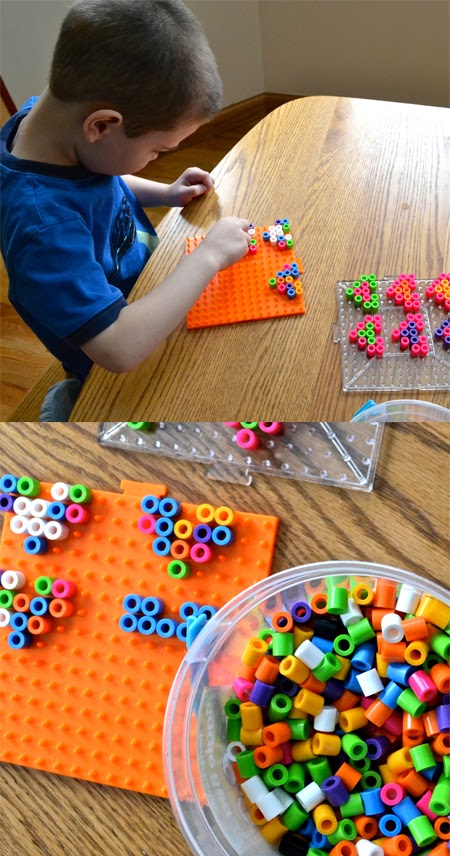
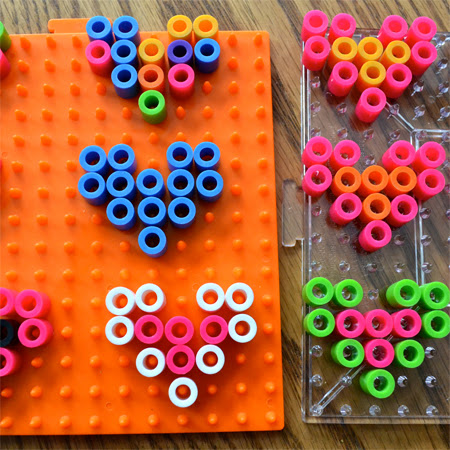
This year, for Valentine's, Buddy wanted to make something special for his classmates at school. So, we pulled out the perler beads and got to work. We've been playing with the larger beads. I think they are way easier for small fingers to work with.
He designed the hearts himself and I ironed them and hot glued a pin to the back.
We mounted most of the pins inside some ready made cards that Buddy received in his Karate class. I'm torn about advertising with a valentine, but he really likes them and it was less work for me. He's really excited to give his friends something that he designed. He even has one special heart for his favorite friend in class. What do you think? Better than candy?
Have a Happy Day and a Great Heart Day.
~MJ
Tuesday, July 9, 2013
DIY High Contrast Mobile
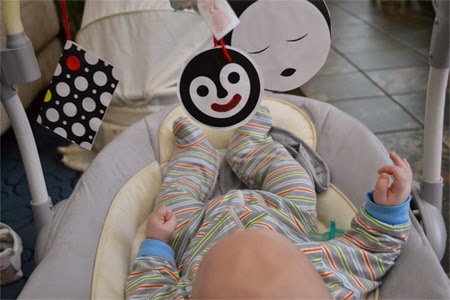
Teddy Bear is becoming very social. He regularly complains (loudly) when we aren't giving him face time. So, I feel bad when I have to leave him to his own devices. I really can't have my face in his face all day long (sad, but true). I decided that Teddy Bear needed more stimulation, basically something to look at other than my face, so instead of purchasing a fancy mobile, I decided to make one.
I did a Google search for high-contrast images. It came up with a whole slew of them. I had an elaborate scheme for making them into a mobile, but then decided that no one has time for that. Simple is good. And even better? He actually looks at the pictures and likes them.
Recently, he has been figuring out how to bat at the pictures and the toys hanging on his play mat. There is a lot going on in his little brain. So fun to see him learning and making connections. That is definitely one of my favorite things about being a parent.
Have a Happy Day!
~MJ
I did a Google search for high-contrast images. It came up with a whole slew of them. I had an elaborate scheme for making them into a mobile, but then decided that no one has time for that. Simple is good. And even better? He actually looks at the pictures and likes them.
Recently, he has been figuring out how to bat at the pictures and the toys hanging on his play mat. There is a lot going on in his little brain. So fun to see him learning and making connections. That is definitely one of my favorite things about being a parent.
 |
| Hmmm...very interesting. |
~MJ
Tuesday, March 19, 2013
Bunny Paper Cut
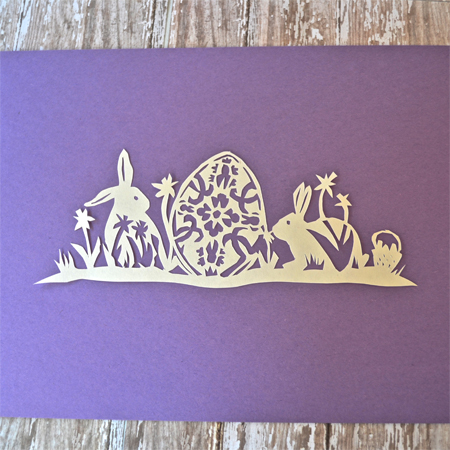
Looking for more Easter decor to put up around the house, I decided to design another paper cut for the season. You might remember that I designed this paper cut for Valentine's. I've mentioned before that I'm definitely an amateur when it comes to the art of paper cutting, but I still enjoy it. The bunny design I put together has a couple of flaws, but I still like the way it turned out.
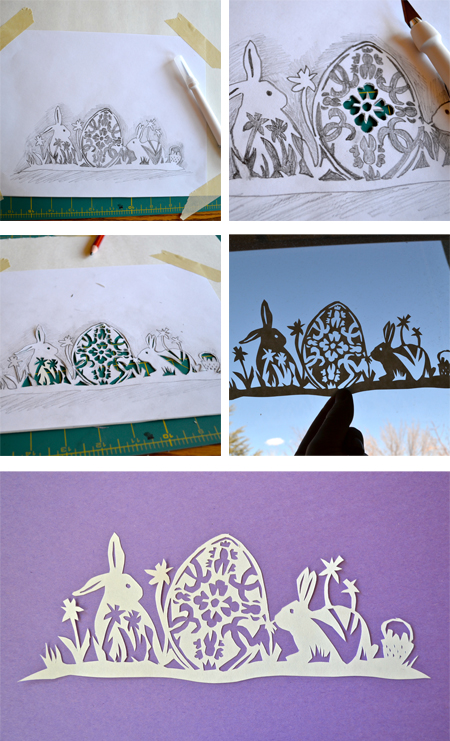
The above shows my cutting process. There are more detailed photos of the process on my Valentine's paper cut post. The pattern needs a little tweaking and I modified it a little as I went along, but I still thought I'd provide my sketch in case you'd like to try it out yourself.Download the Bunny Paper Cut PDF here:
Bunny Paper Cut
Easter is coming up so quickly and I feel very unprepared. Jellybean's birthday is in a week and I keep forgetting that I need to get our Easter plans figured out for just another week after that. Then, of course, there's the whole birth of our third child looming. I still have about 6 weeks to go. I told D today that I need a baby-cation. I'm thinking that involves me, a hotel room, room service, movies and some serious alone time. I doubt that's possible, but it's nice to dream about.
Have a Happy Day!
~MJ
Labels:
Art,
bunny,
decor,
decorating,
diy,
easter,
home,
Knife,
paper cut,
pattern,
scherenschnitte,
Spring
Monday, March 11, 2013
Getting Some Green On
I realized last week that St. Patty's Day was coming up and that my sweet daughter has no green in her wardrobe. So, I determined to do something about it. I decided that despite her lack of green clothing, I could at least make her something to wear in her hair. So, I pulled out the materials and set to work.
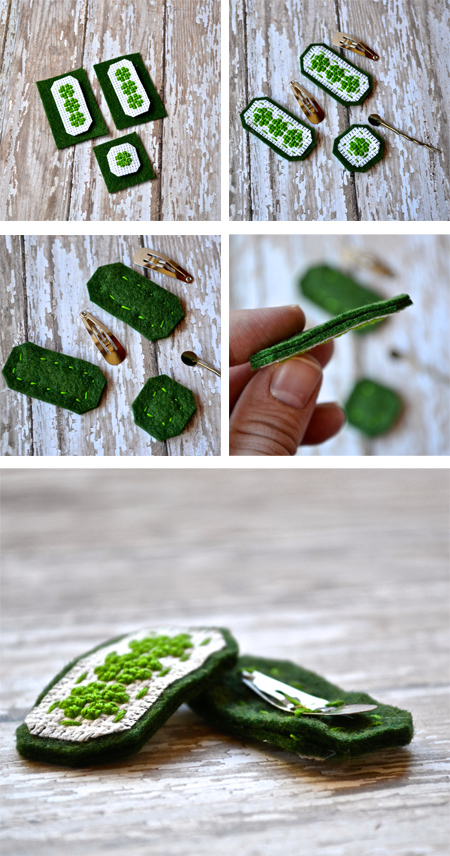
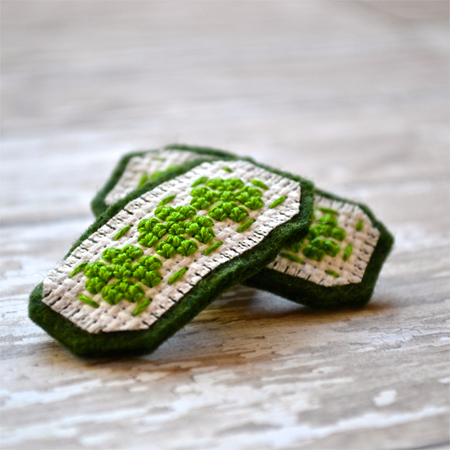
I sketched out a simple cross-stitch pattern and started on the first set of clips:
A little felt and some stitched on clips and those were completed.
I even made something for myself:
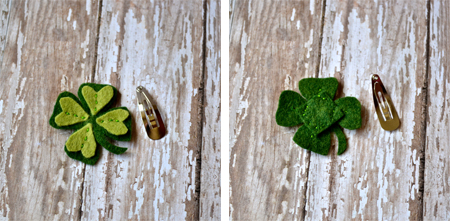
These didn't seem enough, so I broke out the felt again and got cutting:
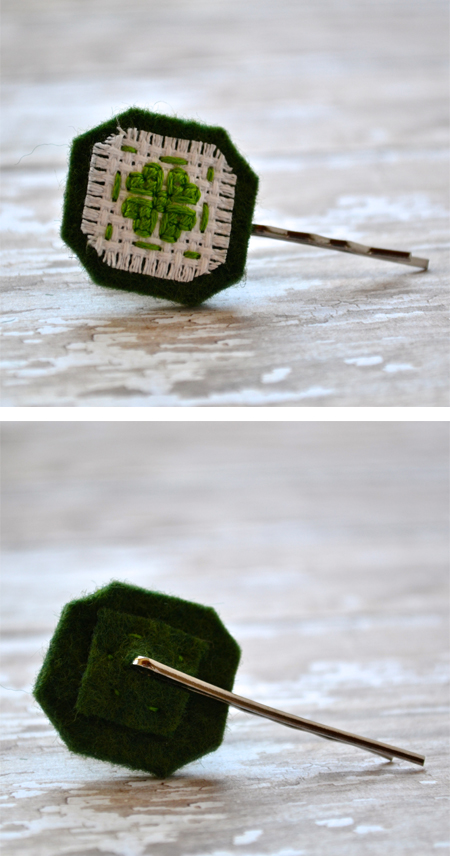
I'm really in to the four-leaf clover.
I like having a cute little girl to wear my clips.
I think these were my favorites:
and if those three ideas don't do it for you, here are a couple more green inspired clips from when I was running my Etsy shop.
Have a Happy Day!
~MJ
I sketched out a simple cross-stitch pattern and started on the first set of clips:
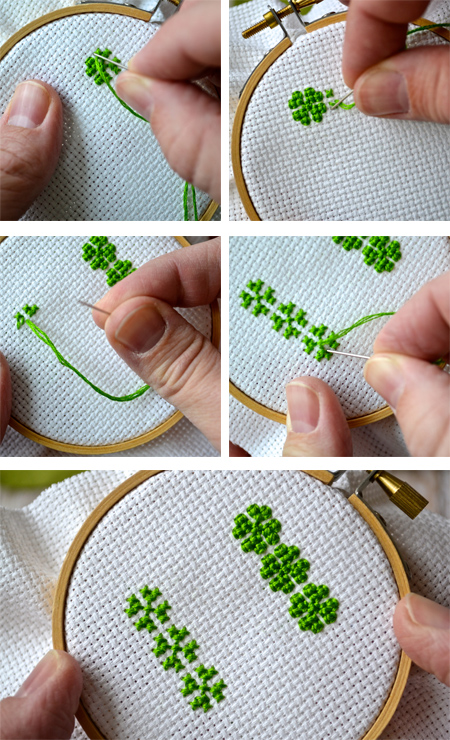 |
| Approximately 60 inches of floss (three strands) used for each clip pattern. |
I even made something for myself:
These didn't seem enough, so I broke out the felt again and got cutting:
I'm really in to the four-leaf clover.
I like having a cute little girl to wear my clips.
I think these were my favorites:
and if those three ideas don't do it for you, here are a couple more green inspired clips from when I was running my Etsy shop.
 |
| Top: Layered fabric and felt. Bottom: fabric yo-yo with brads. |
~MJ
Labels:
Accessories,
bobby pins,
clover,
Cross Stitch,
diy,
felt,
four leaf,
Green,
hair,
Hair Clips,
handmade,
Holiday,
little girl,
lucky,
Spring,
St. Patrick's Day
Thursday, February 28, 2013
Quiet Toy: Animals in a Blanket
I'm always on the look out for good quiet toys for my kids. I especially like something I can throw in my bag for church, doctor's visits or long car trips. I decided to make my own quiet toy during a few nap times this week. A simple little toy that will be perfect for my activity bag.
I went a little overboard on creating the animals for my little pouch. So, now the kids can choose which three they'd like to play with.
They can go with farm animals:
Forest animals:
Or a mixture of the two. Jellybean was pretty excited when I finished these today and promptly introduced herself to each one of the animals. She decided that the fox isn't a very nice animal, so she's letting Buddy play with it. I think I'm going to have to make another pouch for the extra three just so that Buddy and Jellybean can each have their own.
So would you like to make one? Here's the tutorial:
1/4 yard duck cloth
1/4 yard soft flannel, or other fabric for liner
1 package double folded bias tape
Thread, pins, scissors
Protractor
Air erasable pen
Ribbon
Animals:
Scrap fabric in several different patterns
Felt in several different colors (depending on what animals you'd like to create)
Floss (in coordinating colors)
Soft batting
Start with a 10X11 inch piece of your duck cloth and flannel (wrong sides together). You can pin them together if you wish. On one end, pin and sew a piece of bias tape. Before I made this, I had no idea how to sew on bias tape. I used this tutorial on Dana Made It in order to figure it out.
Fold the bias tape edge up 4 inches. Use your protractor and pen to get a nicely rounded edge on both sides.
Pin and sew your final length of bias tape along the outside edge. Sew three equal pockets. Each of mine measures 3 inches. Now, stitch your ribbon to the back of your pouch and it's done, wasn't that easy?
I spent one of my precious nap times sketching out the animal faces that I wanted to use. Then I took my sketches and cut them all out in felt.
Using floss, I stitched the little faces together and then attached them to the bodies. I used an oval pattern that was 5X3 inches for the bodies of my little animals. Then I used a 1/4 inch seam. Make sure when sewing the bodies that you leave at least an inch un-sewn for turning the fabric and stuffing.
Six sweet little animals, now ready for travel. Can't wait to take them for a test run.
Have a Happy Day!
~MJ
 |
| Just tie and toss. |
They can go with farm animals:
Forest animals:
Or a mixture of the two. Jellybean was pretty excited when I finished these today and promptly introduced herself to each one of the animals. She decided that the fox isn't a very nice animal, so she's letting Buddy play with it. I think I'm going to have to make another pouch for the extra three just so that Buddy and Jellybean can each have their own.
So would you like to make one? Here's the tutorial:
Animals in Blanket Quiet Toy:
Time to completion: approx. 3-4 nap timesMaterials:
Pouch:1/4 yard duck cloth
1/4 yard soft flannel, or other fabric for liner
1 package double folded bias tape
Thread, pins, scissors
Protractor
Air erasable pen
Ribbon
Animals:
Scrap fabric in several different patterns
Felt in several different colors (depending on what animals you'd like to create)
Floss (in coordinating colors)
Soft batting
Start with a 10X11 inch piece of your duck cloth and flannel (wrong sides together). You can pin them together if you wish. On one end, pin and sew a piece of bias tape. Before I made this, I had no idea how to sew on bias tape. I used this tutorial on Dana Made It in order to figure it out.
Fold the bias tape edge up 4 inches. Use your protractor and pen to get a nicely rounded edge on both sides.
Pin and sew your final length of bias tape along the outside edge. Sew three equal pockets. Each of mine measures 3 inches. Now, stitch your ribbon to the back of your pouch and it's done, wasn't that easy?
I spent one of my precious nap times sketching out the animal faces that I wanted to use. Then I took my sketches and cut them all out in felt.
Using floss, I stitched the little faces together and then attached them to the bodies. I used an oval pattern that was 5X3 inches for the bodies of my little animals. Then I used a 1/4 inch seam. Make sure when sewing the bodies that you leave at least an inch un-sewn for turning the fabric and stuffing.
Six sweet little animals, now ready for travel. Can't wait to take them for a test run.
Have a Happy Day!
~MJ
Labels:
animals,
diy,
duck,
farm,
forest,
fox rabbit,
imaginative,
owl,
pic,
play,
quiet activity,
sheep,
Spring,
tutorial
Thursday, January 24, 2013
Paper Cut Valentine
I absolutely love the art of paper cutting (Scherenschnitte). There are many true artists out there that create amazing, intricate work. I took a class on that topic a couple of years ago and have been trying my hand at it now and again ever since.
Because I'm not much of an artist and because I'm such an amateur at paper cutting, I shamelessly stole a beautiful paper cut pattern from the internet (here. Wish I had a true photo credit for it.) and then simplified it a little so that I could actually make it work for me. I added some of my own touches as well.
Here's a few tips I picked up in my class if you'd like to dabble a little in paper cutting yourself.
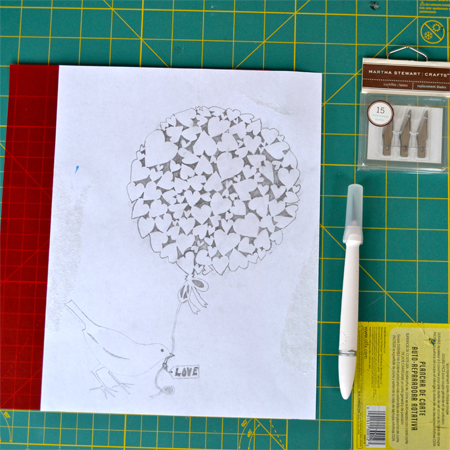
First, you'll need a pattern to work from. (at least I do) I sketched my pattern onto a piece of printer paper. Then you'll need a nice sheet of paper to cut the pattern onto. I decided to go with a sheet of red vellum. I figured that it isn't the easiest to tear, but it is still relatively thin. Whatever paper you choose, make sure that it is the same color all the way through.
Next, you'll want a few tools: A nice craft knife, (this one from Martha Stewart is awesome), a new sharp blade, and a self healing mat to cut on. (A smaller mat than mine is preferable so that you can turn it this way and that with more ease.)
Start cutting the small details on the interior of your pattern. You'll want the excess paper, it makes everything more stable. Go slowly and make small cuts. Once you are done with the small details, move onto the bigger details and then cut the main outline.
As you can see, my cuts are far from perfect, but oh is it satisfying seeing the end result of your hard work. It's almost magical when you carefully separate the paper cut from the outside paper. One last note: Remember to cut the paper and not yourself. That's always good advice.
Have a Happy Day!
~MJ
Sharing on:
Labels:
Art,
balloon,
bird,
decor,
diy,
heart,
paper cut,
scherenschnitte,
tutorial,
valentine,
valentine's day
Monday, January 14, 2013
Pocket Pal: Sweetie the Cat (and Tutorial)
We have been stuck indoors a ton over the last week. If it wasn't the super cold temperatures and terrible air quality, it was a massive snow storm that decided to roll through. Physically, I've been feeling exhausted, but mentally and creatively, I've been going absolutely stir crazy. I completed four of my pins on Pinterest in the last couple of days (more on that tomorrow) and yesterday, during nap time, I decided to make something fun for Jellybean as well.
Jellybean is going through a HUGE kitty cat stage. Half the day, she wants to play "kitties" which involves a lot of crawling around and meowing. ("You be the mommy kitty and I'll be the baby kitty.") I thought with some of my creative energy, I'd go with her current interest and make a little stuffed cat.
I asked her if she wanted a big cat or a little cat. She indicated that she wanted something small. So, I sketched out a little cat softie and got to work. I can't tell you what satisfaction there is in sketching an idea out and then actually creating something from that idea.
I was in such a hurry to get this done, I didn't take a lot of process shots, so I'll give you a brief explanation of how this came together and I'll trust you to take it from there if you are so inclined.
First, I did the above sketch and then cut the sketch out and cut apart the pieces.
Next, I increased the head, body, arm, and leg about a 1/4" and used that to create my pattern.
With pattern in hand, I grabbed some scrap fabric and cut out 2 head and dress pieces and 4 arm and leg pieces.
This is where it gets fuzzy. I started pinning and sewing and basically forgot my camera existed.
So it went from beginning to pin the pieces together to complete before I knew it.
Here are the instructions for the missing pictures, bear with me. I hope it makes sense:
-Pin the head and body pieces together (right sides together, pictured above).
-Pin the arm pieces together and then the leg pieces (right sides together). Sew arm and leg pieces leaving the top of all pieces open for turning and stuffing.
-Sew a single seam across the head and body pieces and then pin together the head/body pieces (right sides together). Sew the head/body, but leave spaces for the arms and legs to be attached.
-Turn all pieces right side out. Stuff legs and arms with batting.
-Attach arms to body and then stuff the head and body.
-Attach legs to body.
I started out sewing by hand and then decided that I would rather use my machine. This doll is small enough that either method would work. I actually forgot to leave the bottom of the body open when sewing and had to rip the seam. (that's always my favorite.)
Finally, I added a few details to the doll. I pulled out some felt for the collar, bows and shoes. Then I used some floss to embroider the face.
I think she turned out sweet. Jellybean must have thought so too. She named her "Sweetie".
Well that burned some of my creative energy. I'll be interested to see what my fingers get itching to do next.
Have a Happy Day!
~MJ
Sharing on:
Labels:
animal,
Cat,
craft,
diy,
doll,
kitty,
little girl,
pocket,
sewing,
softie,
stuffed,
valentine's day
Tuesday, January 8, 2013
Learning the Joy of Giving: Valentine's Mailboxes
Now that it is past the Christmas season, I've wanted to keep the momentum going on teaching the kids about giving. With Valentine's coming up, I remembered some Valentine's mailboxes that I saw in a blog post a couple of years ago. I don't remember exactly where I read about it, so I can't give proper credit, but the author picked up $1 mailboxes at Target for each of her kids and had them give valentines to each other using the boxes.
I thought this was such a sweet idea. Last Spring, I noticed some of those cute mailboxes in the Target dollar section and grabbed a couple. So glad that I did. I brought them out and showed them to the kids last week. I asked them if they would like to decorate them and make drawings/notes/valentines throughout the next little while to put in each other's mailboxes. Their reaction was awesome. They were so excited to get started.
On Saturday, we went out hunting for some decorations for the mailboxes. We settled on stickers. Buddy chose alphabet stickers (surprise!) and Jellybean chose hearts and butterflies. Before nap time, I let the kids decorate their boxes to their liking and then we set them on a table between their rooms.
During naps, I grabbed a couple of valentines and put one in each of their mailboxes with a starburst. They were so incredibly excited to get their first delivery.
I want to make it a fun experience for them to give and receive. Mostly, I want them to think about giving something small to each other, though D and I will likely put small things in there as time goes by. I'm planning to let them stay on the table throughout the next couple of months. Of course, if we really enjoy it, we may keep using the boxes throughout the year.
Jellybean made her first card for Buddy today while he was at preschool. She couldn't wait to tell him that she had left something in his mailbox. He loved getting something from her. I could tell that she was a little sad that she didn't get anything in her mailbox today. I'll have to get with Buddy tomorrow and see if we can fix that...
Have a Happy Day!
~MJ
Sharing on:
Monday, January 7, 2013
Felt Circle Belt
My mid-section has been expanding on a daily basis. Therefore, I've been breaking out my most comfortable maternity clothes. I purchased a simple, black maternity dress online and discovered that instead of it looking cute and flattering (flattering maternity clothes, do those really exists?) it looked more like a black muu muu or...tent. Just because you are pregnant doesn't mean that you would wear utterly shapeless clothing, right?
I ran across this cute tutorial for a diy belt on Kollabora. I didn't have any vinyl on hand, so I decided to take a softer approach and use felt. That said, vinyl will give this project a more polished finish.
I needed approx. 1/4 yard of felt for this project as well as some coordinating grosgrain ribbon and thread. If you are cutting circles in fabric, I highly recommend the Olfa rotary circle cutter. Almost every circle I cut came out perfect. I don't think I could have cut 40 circles without it.
So after following the tutorial and some sewing later, I had a belt to cinch me in and give my dress a little shape. I like actually looking pregnant.
I'm not sure I'm in love with the bright red on black, so I might revisit and make it over again in another color. What do you think?
No more muu muu for me.
Have a Happy Day!
~MJ
Sharing on:
Subscribe to:
Posts (Atom)


