I'm always on the look out for good quiet toys for my kids. I especially like something I can throw in my bag for church, doctor's visits or long car trips. I decided to make my own quiet toy during a few nap times this week. A simple little toy that will be perfect for my activity bag.
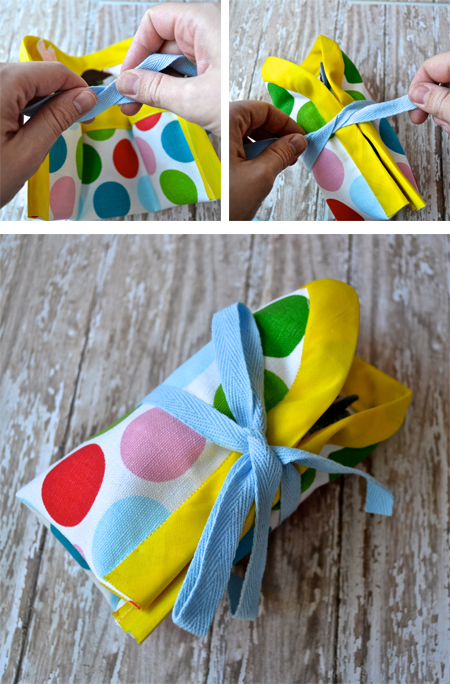 |
| Just tie and toss. |
I went a little overboard on creating the animals for my little pouch. So, now the kids can choose which three they'd like to play with.
They can go with farm animals:
Forest animals:
Or a mixture of the two. Jellybean was pretty excited when I finished these today and promptly introduced herself to each one of the animals. She decided that the fox isn't a very nice animal, so she's letting Buddy play with it. I think I'm going to have to make another pouch for the extra three just so that Buddy and Jellybean can each have their own.
So would you like to make one? Here's the tutorial:
Animals in Blanket Quiet Toy:
Time to completion: approx. 3-4 nap times
Materials:
Pouch:
1/4 yard duck cloth
1/4 yard soft flannel, or other fabric for liner
1 package double folded bias tape
Thread, pins, scissors
Protractor
Air erasable pen
Ribbon
Animals:
Scrap fabric in several different patterns
Felt in several different colors (depending on what animals you'd like to create)
Floss (in coordinating colors)
Soft batting
Start with a 10X11 inch piece of your duck cloth and flannel (wrong sides together). You can pin them together if you wish. On one end, pin and sew a piece of bias tape. Before I made this, I had no idea how to sew on bias tape. I used
this tutorial on Dana Made It in order to figure it out.
Fold the bias tape edge up 4 inches. Use your protractor and pen to get a nicely rounded edge on both sides.
Pin and sew your final length of bias tape along the outside edge. Sew three equal pockets. Each of mine measures 3 inches. Now, stitch your ribbon to the back of your pouch and it's done, wasn't that easy?
I spent one of my precious nap times sketching out the animal faces that I wanted to use. Then I took my sketches and cut them all out in felt.
Using floss, I stitched the little faces together and then attached them to the bodies. I used an oval pattern that was 5X3 inches for the bodies of my little animals. Then I used a 1/4 inch seam. Make sure when sewing the bodies that you leave at least an inch un-sewn for turning the fabric and stuffing.
Six sweet little animals, now ready for travel. Can't wait to take them for a test run.
Have a Happy Day!
~MJ


Hi there! I came across your blog while visiting another site :) How adorable are these little critters! What a fun and creative idea :)
ReplyDeleteI am now following you and I look forward to visiting again.
Hugs,
Stephanie
theenchantingrose.blogspot.com
Thanks so much for dropping by and following!
DeleteYou are so talented! What a wonderful gift for a new baby. Thanks for sharing.
ReplyDeleteThank you so much! I hadn't thought of this as a baby gift, but I imagine it would be much appreciated!
DeleteI linked you in my sewing blog. It's a great and practical idea!
ReplyDeleteLove it.
Ana
http://licenciaparacoser.blogspot.com
Thanks for dropping by and thanks so much for featuring this project on your blog. :)
DeleteSo cute! Love this!
ReplyDeleteYou are so nice! Thanks for visiting and commenting.
DeleteI love this. Will have to make some for the kids at Sacred Heart Children's Hospital. Perfect for them.
ReplyDeleteDona
http://sewingmilesofsmiles.blogspot.com
I just know they'll love them! Thanks for visiting.
DeleteThese are super cute! I'd love to try making them, especially since my baby always likes the loudest toys during church services, and my husband thinks it's funny to see me make "shh" faces at them while they play. You know, at first glance I thought these were finger puppets. What a fun alternative! Love the faces too. Your animals look great!
ReplyDeleteYep, I know the "shhh" face very well. We tested them out at church this last Sunday and they were definitely a nice addition to our activity bag. Thanks for stopping by!
DeleteMuchas grasias por la idea ;) me encanta! voy a hacer para mis hijas:)
ReplyDeleteThis is so darling! What a fun project to make and so much fun for the kiddos to play with! I found it on Pinterest, and I'll be repinning!
ReplyDeleteCONGRATS!!!
ReplyDeleteYou have been featured at The DIY Dreamer!! Come on over and grab your featured button... you deserve it!
http://thediydreamer.com/from-dream-to-reality/features-57/
Don't forget to come back this evening to link up again! :)
This is so adorable! My little girl would LOVE playing with one of these... I might just have to make one.
ReplyDelete