Showing posts with label painting. Show all posts

Monday, December 17, 2012

Jellybean's Magic Mirror

We've been doing some more "making" this last week. I had purchased an unpainted mirror from Hobby Lobby a while back. Jellybean discovered it and asked if we could paint it.
When a child looks at you with this sweet face:
It's kind of difficult to say no.
So, we got out some paint. She wanted orange (her favorite color), but I didn't have that on hand, so she settled for turquoise and gold.
I was a little afraid to let her do painting with acrylic paint on her own, but I let her anyway. I don't know what I was worried about. She did an awesome job. I did have to remind her not to paint her own hands a couple of times, but other than that, she proved to be an excellent little painter.
I helped with the taping and smoothed things out a little for her, but she did almost all of the painting by herself. She is so different from her older brother. (He has always disliked painting projects.) It's fun to have a budding crafter in the family.
While she played, I played too. I doodled on the mirror with some more of the gold paint.
I'm not an amazing artist, but Jellybean approved, so that's good enough for me.
She carried it around for the rest of the day to show it off. Her cousin dubbed it a "magic mirror". I think the name fits.
After this project, I've decided that I need to create more opportunities for Jellybean and I to craft together. She is so proud that she helped create something. I wonder what our next project will be...

Have a Happy Day!

~MJ


Sharing on:

Monday, December 10, 2012

Marshmallow Painting

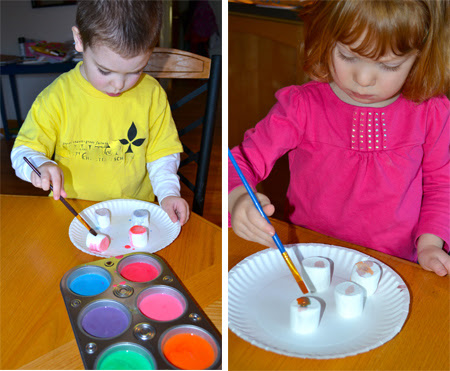
The cold weather has us mostly indoors again and I've been trying to find some activities to do with the kids. I haven't been terribly crafty in that area lately.  A quick search on Pinterest (it saves the day once again) and I found this cute idea for edible painting.
Buddy doesn't love painting, so I wasn't sure how it would go over. It went amazingly well (his pre-school teacher will be impressed). Both kids spent a lot of time painting their marshmallows and really enjoyed themselves. For the paint, I mixed milk and food coloring. The "paint" was really thin, of course, but that didn't bother these artists.
I love how both Buddy and Jellybean really experimented with the colors. Once the marshmallows were completed, I placed them on a clean plate to dry and let the kids spend more time mixing the paint on their plates and then on some paper towels. That added another 15 minutes or so of creative play as well. The only disappointment was that they couldn't eat the marshmallows right away. I thought they might be a little less messy if they had a chance to dry.
When the marshmallows were ready, I put in a movie and let them eat their creations. It was just one of those afternoons...

Have a Happy Day!

~MJ

Monday, October 15, 2012

Painting Spider Webs

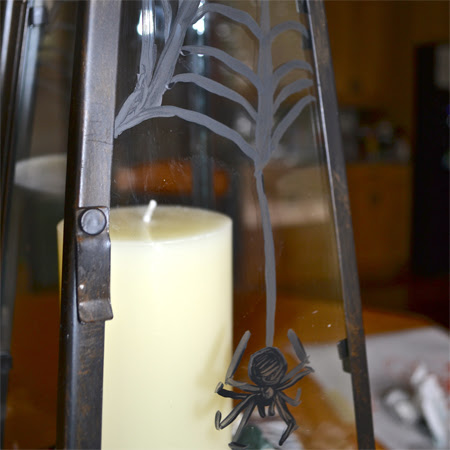
I've seen some great glass painting projects on the web lately. After a little research on how it is done, I decided that I wanted to give a spooky update to the lantern I bought last Spring.  I was going to be more ambitious and do our front windows, but I'm afraid that will have to wait until next year.
My poor little air plant bit the dust a few weeks ago. Turns out, that if you go a couple of days too long and forget to water it, it will shrivel up and die. Sad.
First, I cleaned the glass on the lantern. Then I got out some black, water-based, acrylic paint and a thin Golden Taklon brush and set to work.  Half way through my first web, I decided that I didn't like how it was going. So, I just used some glass cleaner and wiped the paint right off of the glass. Apparently, when the season is over, all that I'll need to do is soak the paint with water and then use a credit card to scrape it from the glass. I hope it works as well as it is supposed to.
It was a fun addition to our Halloween decor. I'm almost thinking of going overboard and painting our mirrors as well...

Have a Happy Day!

~MJ


Sharing On:

Tuesday, September 18, 2012

Painted Leaves

I guess I'm continuing on the leaf theme for the week. I posted a while ago about pressing leaves from my Forest Pansy Red Bud tree. That tree has such beautifully shaped leaves, it was difficult to resist.
Now that the weather is cooling, I've been able to snatch up a few leaves that have begun changing color. So, of course, I pressed those as well. I have some more "valentiney" plans for some of the heart-shaped leaves, but since I love the look of pressed leaves around the house in the Fall, I thought I'd do something different with a couple of them.
I had some paint around the house and some fine paint brushes, so I spent about five minutes and experimented with leaf painting.
I really thought I was ruining the leaf above, but now I think I like the end result. Most of the time, it's best not to tamper with the beauty of nature.
Some of these leaves were too beautiful to touch. I'm thinking of framing the above collection just as it is for my Fall decor. I can't wait to press more of the Fall leaves as they continue to change.

Have a Happy Day!

~MJ

Sharing on: 

Tuesday, February 21, 2012

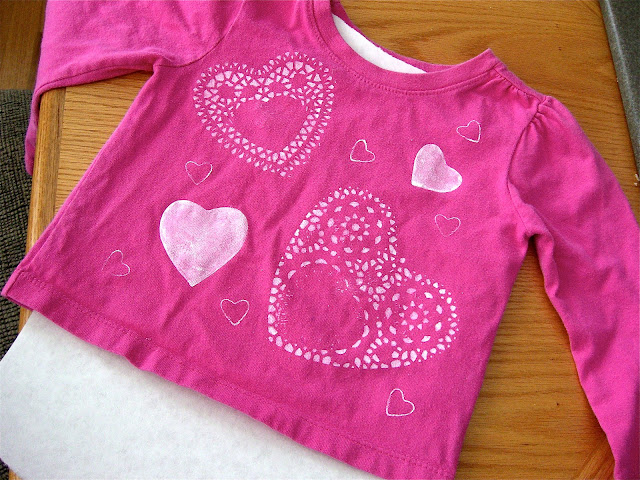
Valentine's Shirt Project

Yes, this V-day craft is about a week late, but in my defense, I had it completed on the day.

This is a project that has been going around. I found it in Family Fun Magazine and decided to expound on the theme.

I mentioned in an earlier post that I found some $2 shirts on my thrift shopping adventure. I used one of those shirts to create this masterpiece.

Materials:

t-shirt
craft paper
paper doilies
fabric paint
paint brush
glue stick
cookie cutters

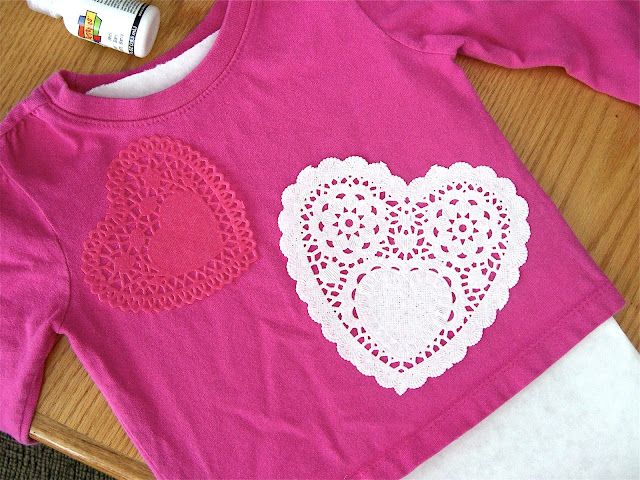
First, I took a sheet of craft paper and put it on the inside of the shirt (I didn't want paint going through to the other side.

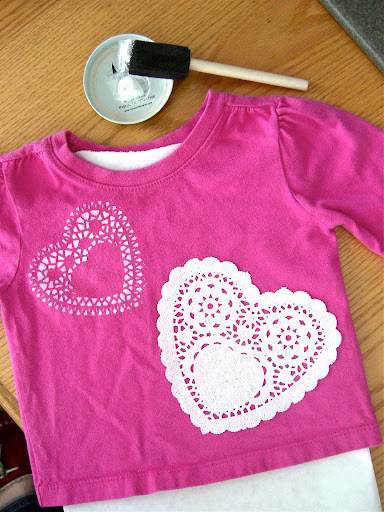
Then I took my doilies and place them where I thought they looked nice. I put a small streak of glue-stick glue on each doily to keep it in place.
After I had painted through each doily and peeled them up, I thought to myself, "It needs more..." This is never a good thought.
I found a few heart shaped cookie cutters and went crazy!
Read the instructions on the fabric paint and make sure you give it enough time to dry.
Jellybean loves her shirt and while she refuses to let me take normally posed pictures of her, she was still pleased to show it off.

I'm sure we'll get a lot of use out of the shirt this spring. I'm thinking this project would work really great with round doilies as well.

Try it out and have a Happy Day!

~MJ

I'm linking up with:
Today's Creative Blog

Wednesday, April 6, 2011

Which Red?

We are getting our house ready to list in the next few weeks (sorry if this is a surprise to my friends and neighbors that may read this). We are sprucing things up and could use some help picking a front door color.

Here is our unassuming brick house in a quiet, tree-lined neighborhood.

We'll be adding shutters back and painting them to match the trim. We'll also be planting some spring flowers.

So...
Which red should the front door be? (The barn red is slightly darker in real life.)
Do you have any other red suggestions for this color brick?
Is it a mistake to go with red?

I need your opinions!

We'll be painting the door either this weekend or next and I'll post the before and after photos when it's complete.

Thanks for your help and Have a Happy Day! :)