Showing posts with label tutorial. Show all posts

Thursday, February 28, 2013

Quiet Toy: Animals in a Blanket

I'm always on the look out for good quiet toys for my kids. I especially like something I can throw in my bag for church, doctor's visits or long car trips. I decided to make my own quiet toy during a few nap times this week. A simple little toy that will be perfect for my activity bag.
Just tie and toss.
I went a little overboard on creating the animals for my little pouch. So, now the kids can choose which three they'd like to play with.
They can go with farm animals:
Forest animals:
Or a mixture of the two. Jellybean was pretty excited when I finished these today and promptly introduced herself to each one of the animals. She decided that the fox isn't a very nice animal, so she's letting Buddy play with it. I think I'm going to have to make another pouch for the extra three just so that Buddy and Jellybean can each have their own.

So would you like to make one? Here's the tutorial:

Animals in Blanket Quiet Toy:

Time to completion: approx. 3-4 nap times

Materials:

Pouch:
1/4 yard duck cloth
1/4 yard soft flannel, or other fabric for liner
1 package double folded bias tape
Thread, pins, scissors
Protractor
Air erasable pen
Ribbon

Animals:
Scrap fabric in several different patterns
Felt in several different colors (depending on what animals you'd like to create)
Floss (in coordinating colors)
Soft batting
Start with a 10X11 inch piece of your duck cloth and flannel (wrong sides together). You can pin them together if you wish. On one end, pin and sew a piece of bias tape. Before I made this, I had no idea how to sew on bias tape. I used this tutorial on Dana Made It in order to figure it out.
 Fold the bias tape edge up 4 inches. Use your protractor and pen to get a nicely rounded edge on both sides.
 Pin and sew your final length of bias tape along the outside edge. Sew three equal pockets. Each of mine measures 3 inches. Now, stitch your ribbon to the back of your pouch and it's done, wasn't that easy?

I spent one of my precious nap times sketching out the animal faces that I wanted to use. Then I took my sketches and cut them all out in felt.
Using floss, I stitched the little faces together and then attached them to the bodies. I used an oval pattern that was 5X3 inches for the bodies of my little animals. Then I used a 1/4 inch seam. Make sure when sewing the bodies that you leave at least an inch un-sewn for turning the fabric and stuffing.
Six sweet little animals, now ready for travel. Can't wait to take them for a test run.

Have a Happy Day!

~MJ

Thursday, January 31, 2013

Spreading the Love. Three Clay Heart Ideas.

This last week, I was really inspired by a beautiful, sterling silver conversation heart necklace. I knew Jellybean would love it, but unfortunately, I'm not that into spending $86 on my 2 year old daughter. Fortunately, I love working with oven-baked clay (take a peek at my clay rose necklace). So, I whipped it out and put together a sweet necklace for my little girl. GO HERE FOR THE TUTORIAL.
It didn't turn out exactly as I had envisioned, but it was greatly appreciated by the recipient.
Couldn't decide on which photo was cuter.
I wanted to share two more ideas for creating clay hearts with you. These two are both gift-tags/ornaments. I created them a few years ago and decided to make more this year. Hope they give you some inspiration.

Have a Happy Day!

~MJ

Thursday, January 24, 2013

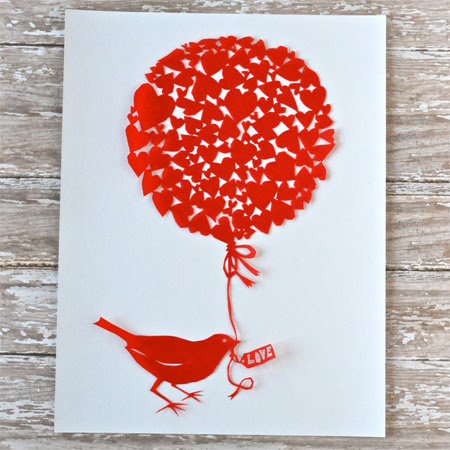
Paper Cut Valentine

I absolutely love the art of paper cutting (Scherenschnitte). There are many true artists out there that create amazing, intricate work. I took a class on that topic a couple of years ago and have been trying my hand at it now and again ever since.

Because I'm not much of an artist and because I'm such an amateur at paper cutting, I shamelessly stole a beautiful paper cut pattern from the internet (here. Wish I had a true photo credit for it.) and then simplified it a little so that I could actually make it work for me. I added some of my own touches as well.

Here's a few tips I picked up in my class if you'd like to dabble a little in paper cutting yourself.
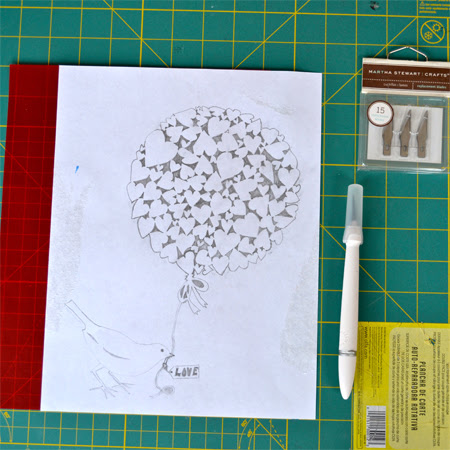
First, you'll need a pattern to work from. (at least I do) I sketched my pattern onto a piece of printer paper. Then you'll need a nice sheet of paper to cut the pattern onto. I decided to go with a sheet of red vellum. I figured that it isn't the easiest to tear, but it is still relatively thin. Whatever paper you choose, make sure that it is the same color all the way through.
Next, you'll want a few tools: A nice craft knife, (this one from Martha Stewart is awesome), a new sharp blade, and a self healing mat to cut on. (A smaller mat than mine is preferable so that you can turn it this way and that with more ease.)
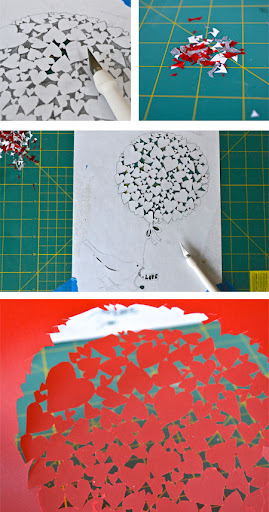
Start cutting the small details on the interior of your pattern. You'll want the excess paper, it makes everything more stable. Go slowly and make small cuts. Once you are done with the small details, move onto the bigger details and then cut the main outline.
As you can see, my cuts are far from perfect, but oh is it satisfying seeing the end result of your hard work. It's almost magical when you carefully separate the paper cut from the outside paper. One last note: Remember to cut the paper and not yourself. That's always good advice.

Have a Happy Day!

~MJ

Sharing on:


Friday, September 14, 2012

Humpty Dumpty Tutorial & Pattern

Welcome back for the Humpty Dumpty Doll Tutorial and Pattern!
First, here is the pattern that I put together for the doll:


In the process of turning the pattern into a PDF, it got shrunk slightly, so I've noted to add a 1/4" seam allowance to each piece when cutting. I don't have pictures for everything. So, if you have questions, feel free to leave them in the comment section.

Now let's make the Humpty Dumpty:
1. Choose your fabrics and gather materials. I just used scrap material that I had around. I chose 5 different fabrics for the following: Face/Hands, Body/Arms, Legs/Bow tie, Spats/Collar and Shoes. You'll need scissors, pins and some coordinating ribbon and thread.

2. Cut out the pattern. You'll need to make sure to cut out 4 each of the shoe, spats, legs, arms and hands. You'll also need 2 each of the body, head and collar. Make sure to fold fabric at indicated fold lines before pinning and cutting.

3. Pay attention to how you are cutting. I laid out all of the pieces after I cut them to make sure I had both right and left legs/arms when all of the fabric pieces are right sides facing out.
4. Pin one head piece and one body piece together, right sides facing each other. Repeat with other two pieces.
5. Sew both along the straight edge.
6. Pin one hand and arm piece together right sides facing each other. Repeat 4 times.
7. Sew hand and arm pieces together.  *After sewing each piece, I made sure to iron the seams.
8. Pin together shoe and spat pieces. Right sides facing each other and repeat 4 times. Then sew together.  *As I went along, I checked to make sure that I did indeed have a right and left leg/ right and left arm. I was a little paranoid about it.

9. Now pin spats and leg pieces together. Right sides facing each other and repeat 4 times. Now iron the seams.  * I ended up ironing the seams for the shoe/spat and leg/spat opposite each other. I wanted the leg (or pant) to look like it had a slight cuff over the spat. If that makes sense.
10. I further defined the cuff look by sewing a straight seam across the outside of each leg.

11. Pin two arm pieces together, right sides facing in and sew together leaving the top open for stuffing.  Repeat for the second arm.  Pin two leg pieces together (make sure the cuff line matches up), right sides together and sew together leaving the top open for stuffing. Repeat for the second leg.

12. Stuff arms and legs leaving about a 1/2" of  fabric at the top. Sew across the top to secure the stuffing.  *While stuffing, I left each limb a bit sparse were the knee/elbow join would be, so that they'd still have a bit of movement. Just don't overstuff.
13. Pin and sew head/body pieces together. Only sew across the head portion, leaving the body open. Pin the arms in on each side of the body. I hand stitched the arms in place. *thumbs pointing up.

14. Stuff the head and body.

15. *This is the trickiest part of this whole project. Pin the rest of the body closed and pin in the legs where you want them.  Hand stitch the body closed and stitch in the legs as you work. I just tried to make my stitching as neat as possible. Before you completely close up the body, add extra stuffing if needed so that the body is nice and filled out.
16. Now I wanted to add a few details. Pin the two collar pieces together and sew. I left the middle bottom section open for turning. Just make sure you leave an opening for turning. Then iron.

17. Cut two rectangles (as big as you want the bow tie to be) Pin and sew the two rectangle bow tie pieces together. Leave a space for turning! I trimmed the corners before I turned it right side out.  Then iron and stitch the center together to create the bow tie.
18. I sketched out the faces I wanted to use. Then I used a disappearing ink quilting pen to draw them onto the fabric. That type of pen is awesome. It makes it really easy to fix any mistakes. I used fabric paint for the faces. I like the Scribblers fabric paint. You can find it at Hobby Lobby for a $1 per bottle.

19. Cut out a rectangle of head fabric and round the corners. I wanted this piece to be about the same width as the doll face and just a little longer to accomodate the seam when stitched on and to leave a little to tuck into the collar on front when in use. Paint your "cracked" face onto this piece of fabric. *I didn't want this to fray, so I used some liquid fray block around the edge of the fabric. Make sure you spot check it on your fabric first to make sure that it dries clear.
20. You're almost done! Some last details: Cut a bit of ribbon (I like to use a polyester blend so that I can melt the edges of the ribbon to prevent fraying). I folded down the top of the collar to shorten it a bit and then sewed the ribbon to the top of the collar. Then I cut a small piece of ribbon and attached it around the middle of the bow tie.  Attach the bow tie to the collar. Now stitch the collar around your Humpty Dumpty. I left a little bit of a pocket at the top of the collar while stitching where I could tuck in the bottom of the alternate face.

21. I didn't picture it, but now you'll want to attach the "cracked" face. I stitched it onto the very top seam on my Humpty's head.  I only stitched across the top, so that I could pull the face forward and then pull it back when not in use. As I stitched, I tried to pull the fabric as flat as possible, so that it would lay mostly flat across the face. Then I trimmed away any excess fabric.
That's the long and short of it. This is my first sewing tutorial. So, I hope all of the steps make sense.
I originally wanted to add some rosy cheeks to my Humpty, then decided against it because I was in a rush and Jellybean wanted the doll right away. I did discover that fabric pastels will work well for that. I also neglected to add a little button detail to the spats. I'll have to get on that.

One final note, I don't have a clever way of hiding the "cracked" face when not in use. I thought about putting a little hat on top of his head to tuck it into or just attaching a bit of velcro to the back of his neck. If you come up with something, do let me know.

Be sure and let me know if you enjoyed this tutorial or if you have questions.

Have a Happy Day!

~MJ

Thursday, September 13, 2012

Humpty Dumpty Doll

Ever since Jellybean saw the Wiggles' song version of Humpty Dumpty, it has been one of her favorite songs. Every night before going to bed, I sing it to her and pretend to drop her when I sing the lyric, "Humpty Dumpty had a great faaaaalllll." Because she loves Humpty so much, I decided that I would make her one. Humpty Dumpty sat on a wall...
and Humpty Dumpty after his great faaaaalllll...
Poor Humpty! It's nice to know that after Humpty gets cracked, we can fix him again though.
Jellybean is in love. Come back tomorrow for the pattern and tutorial. It's been a true labor of love.

ETA: The pattern and tutorial is now available HERE!

Have a Happy Day!

~MJ

And for your viewing enjoyment: The Wiggles' Humpty Dumpty with Sam (why oh why did they let him go?!)


Sharing on: