Showing posts with label kid. Show all posts

Monday, August 20, 2012

Play and Eat with Oatmeal

Oatmeal Sensory Bin
Occasionally, I'll be working on the computer and Jellybean will come sit with me. Because I'm often looking at craft and activity ideas to do with her, she likes to point at the screen and tell me what she'd like me to make or what activity looks fun to her.  Last week, she saw this post on Play Through The Day for an oatmeal sensory bin.  Jellybean wanted to do this activity so badly, that I couldn't turn her down.
Oatmeal Sensory Bin
This is actually my first bonafide sensory bin and an easy one to put together at that.  I had an old container of oatmeal that was expired, so I dumped that in and then grabbed my daughter's Fisher Price farm animals and tossed those in as well.  I also grabbed a couple of cans so that they could dig and pour.
Oatmeal Sensory Bin
Both Jellybean and Buddy enjoyed digging their hands in the bin and playing together with the animals. It's so fun to see them work so creatively with something simple.

I left them to their own devices until I noticed that the oatmeal was being thrown around the room.  That was my cue that the activity was over and it was time for snacks.  Guess what they wanted to eat? Oatmeal. No, we did not eat the oatmeal they played with. Just in case you were wondering.
Oatmeal Sensory Bin
Yum!
Have a Happy Day!

~MJ

Sharing on:

Photobucket

Tuesday, July 31, 2012

Foam Printing

I've always been fascinated by block printing. So, I was really inspired when I saw this idea (from Pinterest, of course) for foam printing. Jellybean and I decided to experiment with this new medium.  Buddy did not participate as he has little to no interest in paint. It's a tad too messy for his taste.
We went to town on a stack of foam plates from the dollar store.  I used water based acrylic paint and Jellybean used finger paints.  We found that neither were thick/tacky enough for a perfect result, but they worked in a pinch. A printmaking ink like one from Speedball would work better. We both used a sharpened pencil to draw with. After a little experimentation, I found it a little easier to work with a letter opener that I had on hand.
I'm finding that Jellybean has a real artistic flare.  She felt that her print needed...something more...
Now that's a piece of art worthy of the refrigerator! Beautiful!

Our experiment was a really good jumping off point. I plan to explore this art form a little more once I have my hands on a higher quality ink.  I'll have to see where that goes.  

Have a Happy Day!

~MJ

This post is partying here:

Tip Junkie handmade projectsToday's Creative BlogLessons Learnt JournalPhotobucketArtsy Play Wednesday with Capri +3

Thursday, July 26, 2012

Color Sort- Let's Learn Colors

Jellybean has been having a little trouble with her colors. So, I decided to put together a simple game to help her. I pulled out some sheets of dollar store craft foam in red, yellow, blue, green and orange. Then I pulled out our tupperware of puff balls and asked the kids to sort the colors.
Yes, we were still in our pajamas. Why do you ask?
After the puff balls had been sorted, I asked the kids to run through the house and find two or three toys that matched each color.
They did an awesome job
and were pretty proud of themselves.
At the end of the activity, I asked Jellybean to name the different colors.  She now has Orange, Red and Yellow down pat (at least for now). We're still working on Green and Blue.  3 out of 5? That's a good morning's work in my book. When we were finished, Jellybean surprised me by breaking into a rendition of the Rainbow Song. "Red and yellow and pink and green, purple and orange and blue. I can sing a rainbow, sing a rainbow, sing a rainbow too."  This was also a good opportunity for Buddy to exercise his teaching skills. He loved helping Jellybean learn her colors. He's a good big brother.
Before we could clean everything up, the game devolved into "Dump the Puff Balls on Jellybean." It was a natural conclusion.

Have a Happy Day!

~MJ

Tuesday, July 3, 2012

Fizzing Planet Art

Jellybean's complete planet with extra cheesy grin.
We had fun with a new rainy scorching day activity this last week.  This was inspired by an art project that I've seen several times floating around Pinterest.  The nice thing about this project is that all of the materials needed were already in my pantry.  
Buddy and Jellybean working on their creations.
The concept is simple: you fill a pie plate with baking soda.  Then you tint vinegar with food coloring.  We used some ramekins to hold our color. It's so fun to see the baking soda and vinegar fizz each time some color is added to the pan.  It's also fun because the color stays where you put it.
Adding more and more color. Jellybean started adding baking soda to her ramekins so that the entire thing would fizz.
Unfortunately, the one tool that would have made this more fun would have been an eye dropper.  Since I didn't have one available, I had the kids use straws to drip the vinegar into the baking soda. It works in theory, but in practice, this method is pretty frustrating for a 2 and 4 year old. So, I took away the straws and handed them each a spoon. That's when the art work took a serious turn.
Plates transforming into alien planets
Now they were adding a lot of color to the plate. The baking soda still provided some great fizz and added a base so that the color would somewhat stay where it was placed. Buddy started talking about his moster planet and the different monsters that live there. Jellybean was pleased with her pretty alien planet and enjoyed sampling the vinegar color (ick).
Buddy putting the final touches on his monster planet.
This is a great activity for a day when you can't be outside.  They spent a good 45 minutes to an hour on their fizzing planets.  Buddy is already excited to make another one. In fact, if I'd had more baking soda, we would have made more that day.


So, what are your favorite rainy/scorching hot day activities??  


Have a Happy Day!


~MJ

This post is participating in:
  Tip Junkie handmade projectsPhotobucket

Tuesday, June 5, 2012

Quiet Activity Idea: Handkerchief Folding

When I was a little girl, my mom would bring a simple white handkerchief to church and would fold it into a baby cradle in order to keep me entertained.  I loved it and would request it often.  As a child, it seemed like magic. Recently, I started carrying a bandana in my church bag and have been experimenting with some different ways to fold it.  Jellybean likes these handkerchief tricks as much as I did all those years ago.  It's a fantastic quiet activity for church or the doctor's office.  Here are two folding ideas that we've been enjoying.
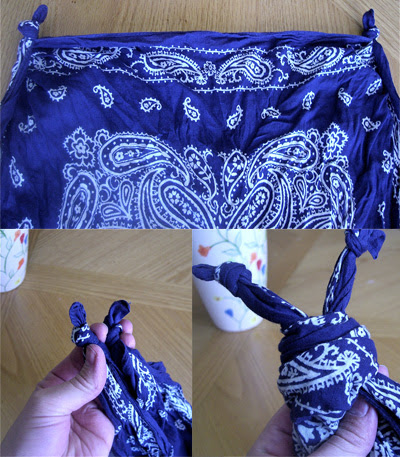
The Bandana Bunny:
Start with a flat bandana and knot the top two corners. Bring the corners together and tie a big knot to create the bunny head and ears.
Knot the remaining corners into two little arms and bring the knot up in the back to make a little bunny tail.

Handkerchief Baby Cradle:
Fold handkerchief into a triangle. Roll each corner to the center, then fold in half. Take corner on very top and fold out and around to create the cradle.  Look, they're twins!
Jellybean likes to hold the cradle by each corner and rock it while singing, "Rock a bye, rock a bye."

Throw a bandana or a handkerchief in your bag and experiment with some folding of your own.  Here are a couple more ideas that I found out on the web.

Handkerchief Doll
Handkerchief Mouse (I couldn't figure this one out. I'm special like that, so maybe you can.)

Have a Happy Day!

~MJ

This post is participating in:
 Today's Creative BlogTip Junkie handmade projectsPhotobucket