

Jellybean is going through a HUGE kitty cat stage. Half the day, she wants to play "kitties" which involves a lot of crawling around and meowing. ("You be the mommy kitty and I'll be the baby kitty.") I thought with some of my creative energy, I'd go with her current interest and make a little stuffed cat.
I asked her if she wanted a big cat or a little cat. She indicated that she wanted something small. So, I sketched out a little cat softie and got to work. I can't tell you what satisfaction there is in sketching an idea out and then actually creating something from that idea.

First, I did the above sketch and then cut the sketch out and cut apart the pieces.
Next, I increased the head, body, arm, and leg about a 1/4" and used that to create my pattern.


So it went from beginning to pin the pieces together to complete before I knew it.

-Pin the head and body pieces together (right sides together, pictured above).
-Pin the arm pieces together and then the leg pieces (right sides together). Sew arm and leg pieces leaving the top of all pieces open for turning and stuffing.
-Sew a single seam across the head and body pieces and then pin together the head/body pieces (right sides together). Sew the head/body, but leave spaces for the arms and legs to be attached.
-Turn all pieces right side out. Stuff legs and arms with batting.
-Attach arms to body and then stuff the head and body.
-Attach legs to body.
I started out sewing by hand and then decided that I would rather use my machine. This doll is small enough that either method would work. I actually forgot to leave the bottom of the body open when sewing and had to rip the seam. (that's always my favorite.)
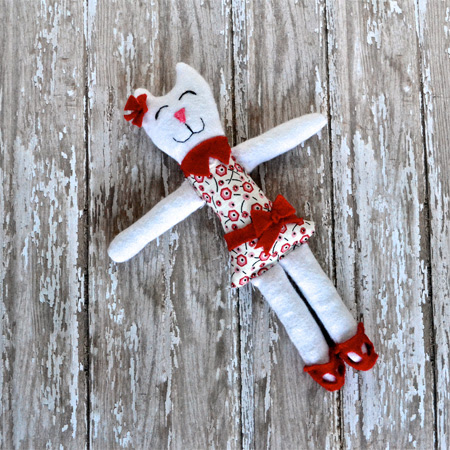
Finally, I added a few details to the doll. I pulled out some felt for the collar, bows and shoes. Then I used some floss to embroider the face.


Have a Happy Day!
~MJ
Sharing on:
This is so stinkin' adorable! Fantastic job. The little details that you added make it even cuter.
ReplyDeleteNew follower!
www.huckleberrylove.com
Thanks! The detail work was the most fun. I may or may not have squealed when I saw how the shoes looked once it was finished. Thanks for dropping by and following. I'll come visit!
DeleteThat is so completely adorable! My kids both like to pretend to be kitties. They are obsessed. I'll need to make this for my daughter and maybe a boy one for my son! Thanks for linking up with Sew Cute Tuesday:)
ReplyDeleteThanks so much for your sweet comment and thanks for dropping by! If you end up making some, I'll definitely want to see how they turn out.
DeleteWhat an adorable little pocket pal, I bet my granddaughter would love one.
ReplyDeleteLindo!!Vou fazer para minha neta,a festa de primeiro aniversário em abril,o tema gata marry.É da hora.Parabéns e obrigada.Seguindo por E~mail.Beijo.
ReplyDeleteCongrats!!
ReplyDeleteYou have been featured at The DIY Dreamer... From Dream To Reality!! Come on over and grab your featured button, you deserve it :)
http://thediydreamer.com/from-dream-to-reality/from-dream-to-reality-linky-party-51/