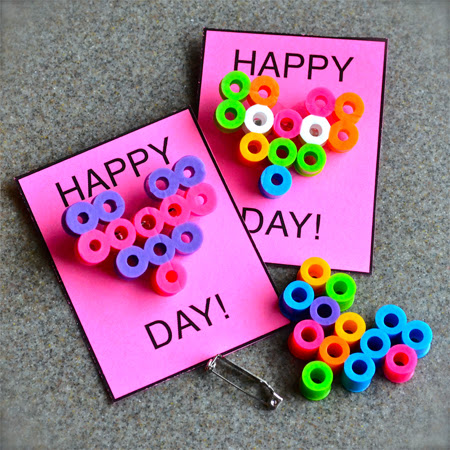
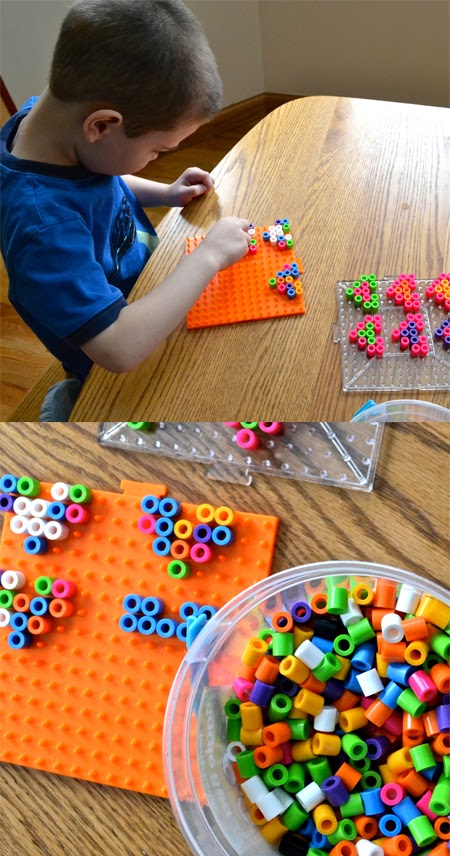
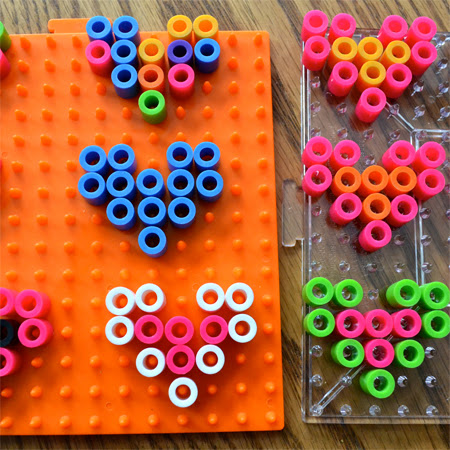
This year, for Valentine's, Buddy wanted to make something special for his classmates at school. So, we pulled out the perler beads and got to work. We've been playing with the larger beads. I think they are way easier for small fingers to work with.
He designed the hearts himself and I ironed them and hot glued a pin to the back.
We mounted most of the pins inside some ready made cards that Buddy received in his Karate class. I'm torn about advertising with a valentine, but he really likes them and it was less work for me. He's really excited to give his friends something that he designed. He even has one special heart for his favorite friend in class. What do you think? Better than candy?
Have a Happy Day and a Great Heart Day.
~MJ
Showing posts with label gift. Show all posts
Showing posts with label gift. Show all posts
Thursday, February 13, 2014
Wednesday, June 12, 2013
Simple Craft: Father's Day Mouse Pad
D and I already decided on a big gift for Father's Day, but I always like to give him something small and crafty from the kids as well. Here's what I did last year. This year, I noticed the lack of mouse pad on D's computer desk. So, I thought I'd buy a cheap pad to fill the need. Then, I thought, why not decorate said mouse pad by tracing all of our hands? So, I did. And since he doesn't really read this blog, I figured I'd blog about it too. Awesome.
I started by tracing everyone's hands. I'm sure D thought it was mighty strange my stalking him for several days nagging him to let me trace his hand. By the way, it is next to impossible tracing a 7 week old's hand. Just in case you were wondering. If you must do it, definitely wait until they are very asleep and even then, trace as quickly as possible.
I cut out the hand tracings and then traced those with some fabric pens. I got an extra large pad, so there was plenty of room.
I think it will look nice when he is using it. Plus, it's always a nice reminder of how small those hands were once. Simple and useful, that makes a good gift in my book. I hope he likes it.
Have a Happy Day!
~MJ
Labels:
craft,
family,
Father's Day,
gift,
hand prints,
mouse pad,
simple,
tracing
Tuesday, June 4, 2013
Wanting to say Thank You!
After bringing our new baby boy home, I couldn't believe the generosity of our neighbors. Several of them brought us dinners. I didn't have to lift a finger or go grocery shopping for a week and a half after Teddy Bear was born. Then, two weeks later, a friend and neighbor showed up at the door with two take and bake pizzas. She saved the day! We are fairly new to the neighborhood, so I was pretty blown away. I couldn't be more humbled and grateful for the kind people that live in this neighborhood. We even had neighbors drop by with surprise gifts, nothing big, but so very nice and useful.
I'm certain that I haven't adequately thanked all those that have helped us in the last 6 weeks, but I did put together some simple thank you treats for those that brought us dinners. It was such a simple thing that I thought I'd share.
All you need is some ink, stamps, paper and treats to share:
Have a Happy Day!
~MJ
I'm certain that I haven't adequately thanked all those that have helped us in the last 6 weeks, but I did put together some simple thank you treats for those that brought us dinners. It was such a simple thing that I thought I'd share.
All you need is some ink, stamps, paper and treats to share:
 |
| Stamped paper. |
 |
| Homemade pencil eraser heart stamp. |
 |
| I love gummy frogs! I hope my neighbors did, too. |
~MJ
Wednesday, March 13, 2013
A Better Burp Cloth
I know a lot of pregnant ladies lately, so I foresee a lot of gift giving in my future. One of my mother's classic baby gifts is a receiving blanket and a set of burp cloths. They aren't your average burp cloths though. A unique shape makes them, in my opinion, a better burp cloth. So, I thought I'd share.
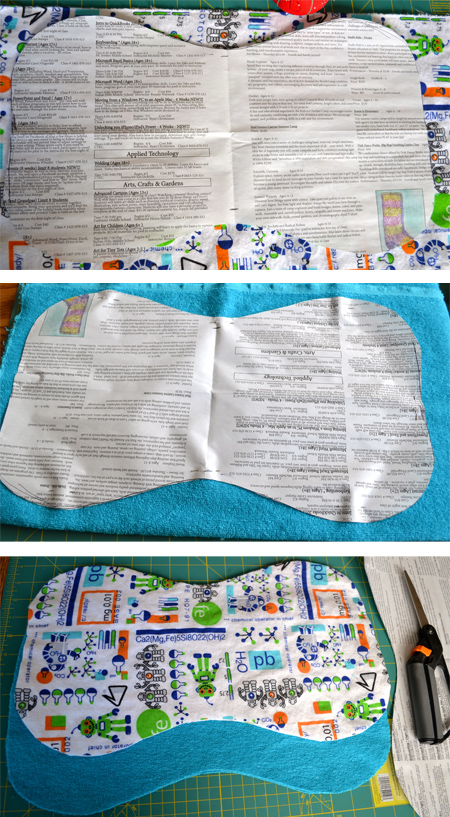
A good friend just had her third baby a few weeks ago, so I decided to put some together. You can never have enough burp cloths, right? I usually just use flannel, but because I liked terry cloth so much with my babies, I decided to use flannel on the front and terry cloth on the back.
And because I had a lot of terry cloth, I thought I'd put together a couple of wash cloths as well. I haven't actually given these to my friend yet and I don't know if she reads my blog, so they might not end up being much of a surprise. Oh well.
Interested in making some burp cloths yourself? Here's the pattern:
Better Burp Cloth Tutorial
Here's what you'll need:
Burp cloth pattern (Note: I couldn't fit the pattern on my 8.5 X 11 paper, so you'll need to double up the fabric and add .25" before the fold when cutting.)
1/2-1 yard Flannel (depends on how many you'd like to make)
1/2-1 yard Terry Cloth
Thread, Pins, Scissors
Here's how I made them:
1. Cut out pattern in flannel and terry cloth.
2. Pin flannel and terry cloth together (right sides together). Sew a .25" seam around the edge. Make sure to leave an opening for turning.
3. Turn right side out and iron.
4. Add some decorative stitching about and inch in from the edge and you're done. My machine isn't fancy, so I just used one of my stretch stitches around the edge.
Do you think my friend's baby will enjoy spitting up on these beauties? I hope so.
Have a Happy Day!
~MJ
Thursday, December 20, 2012
Lemon Pound Cake
We are in full "holidrama" mode over here. This may be the first year that I wondered why I bother with half of the things that I've found so important previous years (i.e. Christmas cards, neighbor gifts..etc.) I look at the list of things that still need to be done and I have to remind myself to take it a day at a time. I've already resigned myself to the fact that the gifts I was supposed to ship to my friends in time for Christmas, will just not make it before Christmas. (sorry friends) Also, I haven't wrapped a single gift and am starting to regret the number of gifts purchased just because I don't want to wrap them.
Today, I felt like I was making some headway on my to-do list, however. I managed to actually mail those totally unnecessary Christmas cards and I did some totally unnecessary baking for our neighbors. Growing up, the traditional baked good for the neighbors was lemon pound cake. I thought I'd revive the tradition for our new neighborhood. Really, I'm just trying to make my mother proud.
Once the pound cakes were cool, I wrapped them up and brought Jellybean along to deliver them. My across the street neighbor never fails to look suspicious when I come over to deliver a small gift. Today, he looked at me in silence for a moment and then asked, "Oh, from across the street?" Uh, yeah, we've been here for more than a year, I was really hoping you'd recognize me by now...
Ingredients:
2 sticks butter (softened)
2 1/2 cups sugar
6 eggs
3 cups flour
1/4 tsp. baking soda
1/2 tsp. salt
1 cup sour cream
1 tsp. vanilla
1 tsp. lemon extract
Method:
Pre-heat oven to 350 degrees F. Cream together butter and sugar. In a separate bowl, mix flour, baking soda and salt. Alternate adding eggs (2 at a time) and flour mixture to creamed butter. Mix in sour cream, vanilla and lemon extract.
Line loaf pans with parchment and grease well. Fill each loaf pan half full.
Bake standard loaves at 350 degrees F for 1 hour.
Bake mini loaf pans at 350 degrees F for 40-45 minutes.
Loaves are done when a toothpick comes out clean and the tops have a nice light golden color.
These cakes smell delicious right out of the oven, but will develop more flavor as they cool.
Enjoy!
Have a Happy Day!
~MJ
Today, I felt like I was making some headway on my to-do list, however. I managed to actually mail those totally unnecessary Christmas cards and I did some totally unnecessary baking for our neighbors. Growing up, the traditional baked good for the neighbors was lemon pound cake. I thought I'd revive the tradition for our new neighborhood. Really, I'm just trying to make my mother proud.
Once the pound cakes were cool, I wrapped them up and brought Jellybean along to deliver them. My across the street neighbor never fails to look suspicious when I come over to deliver a small gift. Today, he looked at me in silence for a moment and then asked, "Oh, from across the street?" Uh, yeah, we've been here for more than a year, I was really hoping you'd recognize me by now...
Lemon Pound Cake:
Makes 2 standard loaves or 5 mini loaves (5.5x3x2)Ingredients:
2 sticks butter (softened)
2 1/2 cups sugar
6 eggs
3 cups flour
1/4 tsp. baking soda
1/2 tsp. salt
1 cup sour cream
1 tsp. vanilla
1 tsp. lemon extract
Method:
Pre-heat oven to 350 degrees F. Cream together butter and sugar. In a separate bowl, mix flour, baking soda and salt. Alternate adding eggs (2 at a time) and flour mixture to creamed butter. Mix in sour cream, vanilla and lemon extract.
Line loaf pans with parchment and grease well. Fill each loaf pan half full.
Bake standard loaves at 350 degrees F for 1 hour.
Bake mini loaf pans at 350 degrees F for 40-45 minutes.
Loaves are done when a toothpick comes out clean and the tops have a nice light golden color.
These cakes smell delicious right out of the oven, but will develop more flavor as they cool.
Enjoy!
Have a Happy Day!
~MJ
Friday, August 3, 2012
Toddler Gift Giving- Salt Dough
Today is Grandma B's birthday. (HAPPY BIRTHDAY!) The family celebrated the occasion this last Sunday. I couldn't be there because of a horrible head cold that just wouldn't go away. I was sad at missing the get together, but I had fun helping my kids make a gift for their grandmother.
We love working with play dough in our house. My kids also really enjoy creating gifts for people. Personally, I love seeing them experience the joy of making something for someone else and then the joy of giving their creation away.
I put together a batch of salt dough and got out some cookie cutters and letter stamps. Both Jellybean and Buddy enjoyed playing with the dough. If left to her own devices, Jellybean just rips dough apart in tiny pieces (she also kept licking the dough), so I helped her cut out some fish. Under her instruction, there had to be a mama, a dada and a baby fish. I also rolled out a circle so she could do a hand impression.
Buddy lives for Halloween and was very attracted to the pumpkin and ghost cookie cutters. He also molded together a "monster box." Apparently, Grandma knew immediately that it was from him due to the "ABC" stamped on the outside (his other obsession is with the alphabet).
After the salt dough was baked and cooled, I got out some markers and let them color their creations.
-1 cup of salt
-Half a cup of water
-Mix it together and knead it
-When ready to cook, put on a baking sheet in the oven at 200 degrees F for 2-3 hours
-When cool, paint or decorate. You may wish to varnish or cover with gloopy glue when dry.
When researching salt dough recipes, I came across a great resource for play dough recipes: The Imagination Tree. The post has over a dozen recipes/ideas for using play dough. It also talks about the benefits of working with play dough and how the medium of play dough encourages imaginative play. It's worth a read.
Have a Happy Day!
~MJ
Sharing this post:

We love working with play dough in our house. My kids also really enjoy creating gifts for people. Personally, I love seeing them experience the joy of making something for someone else and then the joy of giving their creation away.
I put together a batch of salt dough and got out some cookie cutters and letter stamps. Both Jellybean and Buddy enjoyed playing with the dough. If left to her own devices, Jellybean just rips dough apart in tiny pieces (she also kept licking the dough), so I helped her cut out some fish. Under her instruction, there had to be a mama, a dada and a baby fish. I also rolled out a circle so she could do a hand impression.
Buddy lives for Halloween and was very attracted to the pumpkin and ghost cookie cutters. He also molded together a "monster box." Apparently, Grandma knew immediately that it was from him due to the "ABC" stamped on the outside (his other obsession is with the alphabet).
After the salt dough was baked and cooled, I got out some markers and let them color their creations.
Salt Dough Recipe:
-1 cup of flour-1 cup of salt
-Half a cup of water
-Mix it together and knead it
-When ready to cook, put on a baking sheet in the oven at 200 degrees F for 2-3 hours
-When cool, paint or decorate. You may wish to varnish or cover with gloopy glue when dry.
When researching salt dough recipes, I came across a great resource for play dough recipes: The Imagination Tree. The post has over a dozen recipes/ideas for using play dough. It also talks about the benefits of working with play dough and how the medium of play dough encourages imaginative play. It's worth a read.
Have a Happy Day!
~MJ
Sharing this post:

Labels:
gift,
giving,
imaginative,
kids,
play,
play dough,
recipe,
Salt dough,
toddler,
toddler gift
Monday, June 18, 2012
Father's Day 5 Minute Craft
We just finished celebrating Father's Day in our home. It was a nice day. We got to spend time with my Dad, D's Dad and D's Grandfather.
To celebrate the dad in this house, the kids helped me put together a little gift.
I had some scrap booking paper on hand, so I traced the kids' hands on some scrap paper and used that as a pattern for cutting out their prints in color. Then I photoshopped a message and printed it out on some patterned paper. After I glued on the hands, I slapped the entire thing in a frame and whallah!
If you are interested in the template for the message, here it is:
I got the inspiration for this project from this awesome blog: Roots & Wings Co.
You'll notice, that she did her lovely piece on a painted canvas with the hands actually going down, which may or may not add a little extra cuteness to the phrase, "hands down." Also note that their dad is apparently, "the World's Best" That's a pretty lofty claim. Sorry, D, I couldn't quite go there. heh.
This version seemed a little more, what's the word...work. I'm too lazy for canvases and paint. Especially if the project calls for a canvas and paint on the evening prior to Father's Day and the stores are already closed. I do wish I had placed the hands pointing down though, I totally missed that element. I didn't even notice until D was unwrapping it. He claims that it doesn't make a difference. I'll take his word for it.
I hope you all had a fantastic time celebrating the dads in your life.
Have a Happy Day!
~MJ
To celebrate the dad in this house, the kids helped me put together a little gift.
I had some scrap booking paper on hand, so I traced the kids' hands on some scrap paper and used that as a pattern for cutting out their prints in color. Then I photoshopped a message and printed it out on some patterned paper. After I glued on the hands, I slapped the entire thing in a frame and whallah!
If you are interested in the template for the message, here it is:
 |
| Best Dad Template for 8.5X10 Print |
You'll notice, that she did her lovely piece on a painted canvas with the hands actually going down, which may or may not add a little extra cuteness to the phrase, "hands down." Also note that their dad is apparently, "the World's Best" That's a pretty lofty claim. Sorry, D, I couldn't quite go there. heh.
This version seemed a little more, what's the word...work. I'm too lazy for canvases and paint. Especially if the project calls for a canvas and paint on the evening prior to Father's Day and the stores are already closed. I do wish I had placed the hands pointing down though, I totally missed that element. I didn't even notice until D was unwrapping it. He claims that it doesn't make a difference. I'll take his word for it.
I hope you all had a fantastic time celebrating the dads in your life.
Have a Happy Day!
~MJ
Labels:
5 minute craft,
activity,
Children,
craft,
diy,
easy,
Father's Day,
gift,
Gift Giving,
gift ideas,
hand prints,
hands,
kids,
quick
Subscribe to:
Posts (Atom)


