When I was young, my grandmother made a small jewelry travel pouch for me. That little pouch has gone with me on all of my trips and has kept my jewelry safe and my necklaces from getting tangled. When I'm not traveling, I keep it on my dresser with my rings and watch in it.
 |
| Original Travel Pouch |
I got looking at my little pouch the other day and decided that I'd like to re-create it. I thought it would make a fantastic gift for friends or family. So, that's exactly what I did.
It's a really simple concept and except for one bit of laziness on my part, I tried to make mine true to the original. It's such a sweet little pouch. So easy to wrap up and throw in your bag.
Jewelry Travel Pouch Tutorial
Materials:
Just over a quarter of a yard of printed fabric
Just over a quarter of a yard of plain fabric for lining
Coordinating thread
Measuring tape or protractor
Air-erasable pen
43 inches of thin, coordinating ribbon
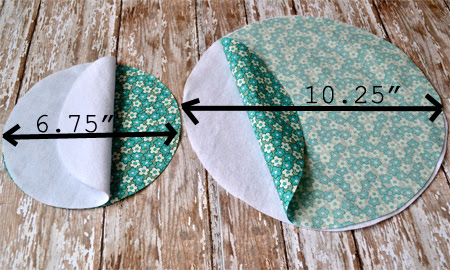
Start with two sets of circles (place them right sides together):
Sew a .25" seam around each circle and make sure to leave an inch or so open for turning. (You'll notice in the original that she used a buttonholer to create the openings for the ribbon. I am not an expert seamstress. I *think* she must have measured and done the button holes before she sewed the large circle together. I'm not sure, but i was too lazy to figure it out.)
Iron and place finished circles on top of each other like so:
Now, you'll actually need to pull out the tape measure. I pulled out my trusty protractor. Find the center of the small circle. Using a air-erasable pen, you'll want to mark out the 8 pockets. I started at 90 degrees and then worked around the circle making another mark at 45 degrees. Just like cutting up a pizza.
Sew straight lines along your markings out to the edge of the small circle. Then sew a small circle about an inch from the edge. After that, sew two circles (.25" apart) around the outside of the smaller circle (on the large circle) to create a channel for your ribbon.
Time to insert your ribbon. This is where my laziness came in. I used my craft knife to gently cut a slit on each side of the pouch for the ribbon. I was careful not to slit the liner fabric. Then I used some fray check on the slits. You could also get out some needle and thread and wrap the edges of the slits in thread (seemed like a lot of work at the moment, but would make the holes more finished). Using a safety pin, insert your ribbon into the channel and then knot the ends of the ribbon together.
As a final touch for gift giving, add the little poem that my grandmother added to mine:
 |
| "Not a necklace will you tangle, when you travel place to place. Eight separate little pockets are in this pretty case. Whatever is your pleasure, how smart this pouch will be. Traveling with your 'treasures,' you'll have this gift from me." |
I've even made of a PDF you can print with the words:
If you are keeping it for yourself, all that is left to do is to load it up with your jewelry:
I love my little pouch so much, can't wait to make a bunch to give as gifts. That's right friends, you may have something to look forward to. :)
Have a Happy Day!
~MJ


You're so smart! I still have my pouch from Grandma. :)
ReplyDeleteThat's nothing short of genius! I am making these for everyone I know!
ReplyDeleteI've put this on my board at Pinterest - so clever! Well done you!
ReplyDeleteThanks so much!
DeleteThanks for this tutorial! I've just made myself one from some lovely canvas fabric I had leftover from an upholstery project. Should be sturdy and hard-wearing for lots of travel, and I've already put a few things in it just to show it off :)
ReplyDeleteYay! I'm so glad. Happy travels!
DeleteI like the pockets to be a little deeper, so I make he inner stitched circle smaller & also add a circle of batting between the layers. I do measure & add the eyelet button holes.
ReplyDelete