Showing posts with label decorating. Show all posts

Tuesday, March 19, 2013

Bunny Paper Cut

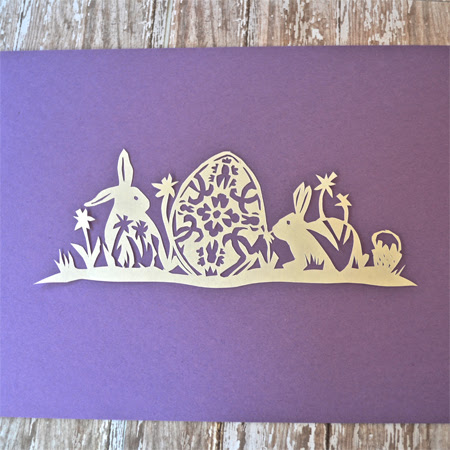
Looking for more Easter decor to put up around the house, I decided to design another paper cut for the season. You might remember that I designed this paper cut for Valentine's. I've mentioned before that I'm definitely an amateur when it comes to the art of paper cutting, but I still enjoy it. The bunny design I put together has a couple of flaws, but I still like the way it turned out.
The above shows my cutting process. There are more detailed photos of the process on my Valentine's paper cut post. The pattern needs a little tweaking and I modified it a little as I went along, but I still thought I'd provide my sketch in case you'd like to try it out yourself.

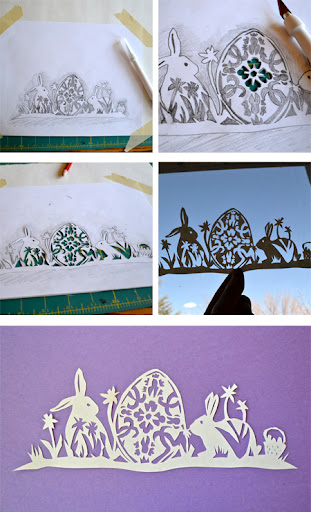
Download the Bunny Paper Cut PDF here:
Bunny Paper Cut

Easter is coming up so quickly and I feel very unprepared. Jellybean's birthday is in a week and I keep forgetting that I need to get our Easter plans figured out for just another week after that. Then, of course, there's the whole birth of our third child looming. I still have about 6 weeks to go. I told D today that I need a baby-cation. I'm thinking that involves me, a hotel room, room service, movies and some serious alone time. I doubt that's possible, but it's nice to dream about. 

Have a Happy Day!

~MJ

Tuesday, December 11, 2012

Winter Porch Decor Part 2

I'm still adding some decorative touches all around my house. My front porch has been looking pretty bare, so I thought it would be nice to add more greenery.  I had already created an arrangement using a large planter:
So, I decided to continue on with that theme.  I found some great pine cones at Hobby Lobby, then later found some that were equally as nice at a local garden store for a fraction of the price. Unfortunately, I had already purchased the pine cones from Hobby Lobby. I guess there's always next year, if I find that I need more. I also borrowed a few more pine boughs from my neighbor's tree (thanks neighbor).
A few large, red ornaments were the finishing touch. (look you can see my reflection in one of them) I used some floral wire to wire it all together. We get some unbelievable wind, so I also wired the arrangement to the bench. Just a simple, but lovely little touch. It doesn't take much to make me feel proud of myself.

Have a Happy Day!

~MJ

Thursday, December 6, 2012

Another Holiday Wreath

You may be wondering if I spent any time with my children this week. I'm pretty sure that's who I spent the majority of my time with, though to look at this blog this week, you may not know it.

I've just been in the mood to make things lately and have felt the need to take pictures and share (of course). So, here's the last project of the week. A really simple holiday wreath; completed during nap time yesterday. I had a grape vine wreath that has been sitting around since last year just beckoning to me. I also had a bag of holiday "doo-dads"(pine cones, small shiny balls and cinnamon sticks) that has been sitting around. I purchased it on sale last year as well. So, I sat down with my trusty glue gun and went to work.
This sweet little wreath has found its home on my mantel. As an added bonus, the cinnamon sticks still have some scent left. Weird how a quick project like this can lend such a sense of accomplishment. It's the little things I suppose.

Have a Happy Day!

~MJ

Sharing on:

Wednesday, November 28, 2012

Decorating the Little Tree

Last year I purchased a little faux tree for the kids to decorate. On Monday, I decided it was time to break out the Christmas decorations. The kids were so excited to get the little tree out and decorate it themselves. I let them do all of the decorating with the exception of a suggestion here or there on ornament placement. If I had left them completely to their own devices, all of the ornaments would be located on their eye level. Being that it is their tree, I think I might have a few control issues.
Knowing that I might like to take some pictures of the decorating, before I set up the tree, I decided to clean up our family room. Jellybean noticed my efforts and asked, "Mama, why you cleaning up? Is someone coming to visit us?" I'm guessing that the sight of me cleaning has not been a common one lately.
Yesterday, we got out the big tree and decided to decorate it as well. This is where I truly discovered my control issues. I snapped at the kids several times about touching the more fragile ornaments and pretty much ended up sucking all of the Christmas spirit out of the activity. There may have been tears involved...I think I have a problem. Fortunately, the tree is now decorated and both children are happy. I'm assuming that afternoon won't be added to their (most likely) growing list of childhood traumas.
So, how is the Christmas decorating going in your house?

Have a Happy Day!

~MJ

Wednesday, October 31, 2012

Halloween Craft: Salt Dough Ghosts

For my birthday, last month, my awesome sister gave me all the ingredients to make some salt dough. With it she printed out this great idea from Family Fun for salt dough ghosts. I thought it would be a fun craft to do with my children on the day before Halloween.

It was a fun craft, unfortunately, I was the only one into actually making the ghosts.  Buddy decided that he wasn't interested in salt dough and Jellybean decided to work on her own projects. This included smashing two of my already created ghosts... Anyway, I had fun, Jellybean kept busy and I like my little "ghosties."

Here they are being created:
Jellybean working on her own project with some Halloween cookie cutters:
And then the ghosts after their short stint in the microwave, cooled and faces added:
While alive, two of these ghosts were sumo wrestlers. Can't you tell?
I don't know how these will hold up, but they will be adorable in my Halloween mantel next year if they are still in one piece. I love the additional craft idea my sister gave me for some spooky paper bag trees. Would be so cute with the ghosts in a Halloween table display.

If you are looking for a ridiculously easy Halloween craft today, this might be the ticket.

Have a Happy Day!

~MJ


Sharing on: 


Monday, October 15, 2012

Painting Spider Webs

I've seen some great glass painting projects on the web lately. After a little research on how it is done, I decided that I wanted to give a spooky update to the lantern I bought last Spring.  I was going to be more ambitious and do our front windows, but I'm afraid that will have to wait until next year.
My poor little air plant bit the dust a few weeks ago. Turns out, that if you go a couple of days too long and forget to water it, it will shrivel up and die. Sad.
First, I cleaned the glass on the lantern. Then I got out some black, water-based, acrylic paint and a thin Golden Taklon brush and set to work.  Half way through my first web, I decided that I didn't like how it was going. So, I just used some glass cleaner and wiped the paint right off of the glass. Apparently, when the season is over, all that I'll need to do is soak the paint with water and then use a credit card to scrape it from the glass. I hope it works as well as it is supposed to.
It was a fun addition to our Halloween decor. I'm almost thinking of going overboard and painting our mirrors as well...

Have a Happy Day!

~MJ


Sharing On:

Monday, September 24, 2012

Tangled Weave Pumpkin Basket

Inspiration struck over the weekend. I've been slowly adding to my Autumn decor, but I haven't wanted to actually start full on decorating for Fall. Well, apparently I'm really gearing up, because I had an idea for an Autumn project that just couldn't wait. I put my daughter's halloween costume on hold (yet again) in favor of creating a pumpkin basket to add to my decor.
I wanted the actual shape of a pumpkin, so I bought a small pie pumpkin for my form. I cut it in half and pulled out the pulp and seeds (mmm roasted pumpkin seeds. I'll post about that tomorrow).
Then I took over the majority of the dining room table for the entire weekend and went to work. I covered my work surface in wax paper and I wrapped each half of the pumpkin in plastic wrap. Then I began wrapping each half in yarn, smoothing Elmer's glue over the yarn as I worked. When I was done with that, I actually mixed some glue with a little water in a bowl and, using a brush, smoothed on a little more glue here and there, where I thought the basket might need a little more strength.
It took quite a while for it to dry. Even with a little help from my blow dryer, it took this the afternoon and over night for it to dry. Once the yarn was stiff, I pulled the plastic wrap from the pumpkins and peeled it carefully away from the yarn. There was some dried glue here and there that required some clean up, but all in all, it worked really well.
Plus, I think it turned out pretty cute. I'm thinking of adding a couple of leaves to the top of it, but haven't found what I like yet. I think this will be a fun addition to my mantel decor for Fall.

Have a Happy Day!

~MJ

Sharing On: