Showing posts with label doll. Show all posts

Monday, January 14, 2013

Pocket Pal: Sweetie the Cat (and Tutorial)

We have been stuck indoors a ton over the last week. If it wasn't the super cold temperatures and terrible air quality, it was a massive snow storm that decided to roll through. Physically, I've been feeling exhausted, but mentally and creatively, I've been going absolutely stir crazy.  I completed four of my pins on Pinterest in the last couple of days (more on that tomorrow) and yesterday, during nap time, I decided to make something fun for Jellybean as well.
Jellybean is going through a HUGE kitty cat stage. Half the day, she wants to play "kitties" which involves a lot of crawling around and meowing. ("You be the mommy kitty and I'll be the baby kitty.") I thought with some of my creative energy, I'd go with her current interest and make a little stuffed cat.
I asked her if she wanted a big cat or a little cat. She indicated that she wanted something small. So, I sketched out a little cat softie and got to work. I can't tell you what satisfaction there is in sketching an idea out and then actually creating something from that idea.
I was in such a hurry to get this done, I didn't take a lot of process shots, so I'll give you a brief explanation of how this came together and I'll trust you to take it from there if you are so inclined.
First, I did the above sketch and then cut the sketch out and cut apart the pieces.
Next, I increased the head, body, arm, and leg about a 1/4" and used that to create my pattern.
With pattern in hand, I grabbed some scrap fabric and cut out 2 head and dress pieces and 4 arm and leg pieces.
This is where it gets fuzzy. I started pinning and sewing and basically forgot my camera existed.
So it went from beginning to pin the pieces together to complete before I knew it.
Here are the instructions for the missing pictures, bear with me. I hope it makes sense:
-Pin the head and body pieces together (right sides together, pictured above).
-Pin the arm pieces together and then the leg pieces (right sides together). Sew arm and leg pieces leaving the top of all pieces open for turning and stuffing.
-Sew a single seam across the head and body pieces and then pin together the head/body pieces (right sides together). Sew the head/body, but leave spaces for the arms and legs to be attached.
-Turn all pieces right side out. Stuff legs and arms with batting.
-Attach arms to body and then stuff the head and body.
-Attach legs to body.

I started out sewing by hand and then decided that I would rather use my machine. This doll is small enough that either method would work. I actually forgot to leave the bottom of the body open when sewing and had to rip the seam. (that's always my favorite.)

Finally, I added a few details to the doll. I pulled out some felt for the collar, bows and shoes. Then I used some floss to embroider the face.
I think she turned out sweet. Jellybean must have thought so too. She named her "Sweetie".
Well that burned some of my creative energy. I'll be interested to see what my fingers get itching to do next.

Have a Happy Day!

~MJ

Sharing on:


Thursday, September 20, 2012

Baby Doll Bath Time

This morning Jellybean undressed all of her baby dolls and decided that they all needed a bath. I happened to have an old infant tub in storage, so I got it out for her.
She then decided that she needed water in the bathtub, but seeing that none of the dolls could get wet, I decided to shred up some tissue paper and make some faux water.
She loved her baby bath and played with it all day long.
Over and over again: Dressing and undressing her dolls, washing them in the bath and then drying them off and having me help her swaddle them.
Shhh...they're sleeping.
My sweet little girl loves her baby dolls and I love her.
Have a Happy Day!

~MJ

Sharing on:
Kids Co-Op

Friday, September 14, 2012

Humpty Dumpty Tutorial & Pattern

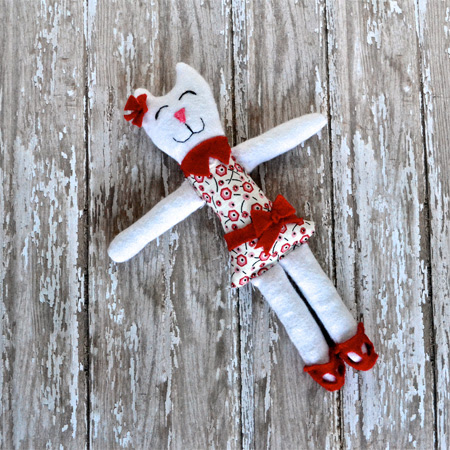
Welcome back for the Humpty Dumpty Doll Tutorial and Pattern!
First, here is the pattern that I put together for the doll:


In the process of turning the pattern into a PDF, it got shrunk slightly, so I've noted to add a 1/4" seam allowance to each piece when cutting. I don't have pictures for everything. So, if you have questions, feel free to leave them in the comment section.

Now let's make the Humpty Dumpty:
1. Choose your fabrics and gather materials. I just used scrap material that I had around. I chose 5 different fabrics for the following: Face/Hands, Body/Arms, Legs/Bow tie, Spats/Collar and Shoes. You'll need scissors, pins and some coordinating ribbon and thread.

2. Cut out the pattern. You'll need to make sure to cut out 4 each of the shoe, spats, legs, arms and hands. You'll also need 2 each of the body, head and collar. Make sure to fold fabric at indicated fold lines before pinning and cutting.

3. Pay attention to how you are cutting. I laid out all of the pieces after I cut them to make sure I had both right and left legs/arms when all of the fabric pieces are right sides facing out.
4. Pin one head piece and one body piece together, right sides facing each other. Repeat with other two pieces.
5. Sew both along the straight edge.
6. Pin one hand and arm piece together right sides facing each other. Repeat 4 times.
7. Sew hand and arm pieces together.  *After sewing each piece, I made sure to iron the seams.
8. Pin together shoe and spat pieces. Right sides facing each other and repeat 4 times. Then sew together.  *As I went along, I checked to make sure that I did indeed have a right and left leg/ right and left arm. I was a little paranoid about it.

9. Now pin spats and leg pieces together. Right sides facing each other and repeat 4 times. Now iron the seams.  * I ended up ironing the seams for the shoe/spat and leg/spat opposite each other. I wanted the leg (or pant) to look like it had a slight cuff over the spat. If that makes sense.
10. I further defined the cuff look by sewing a straight seam across the outside of each leg.

11. Pin two arm pieces together, right sides facing in and sew together leaving the top open for stuffing.  Repeat for the second arm.  Pin two leg pieces together (make sure the cuff line matches up), right sides together and sew together leaving the top open for stuffing. Repeat for the second leg.

12. Stuff arms and legs leaving about a 1/2" of  fabric at the top. Sew across the top to secure the stuffing.  *While stuffing, I left each limb a bit sparse were the knee/elbow join would be, so that they'd still have a bit of movement. Just don't overstuff.
13. Pin and sew head/body pieces together. Only sew across the head portion, leaving the body open. Pin the arms in on each side of the body. I hand stitched the arms in place. *thumbs pointing up.

14. Stuff the head and body.

15. *This is the trickiest part of this whole project. Pin the rest of the body closed and pin in the legs where you want them.  Hand stitch the body closed and stitch in the legs as you work. I just tried to make my stitching as neat as possible. Before you completely close up the body, add extra stuffing if needed so that the body is nice and filled out.
16. Now I wanted to add a few details. Pin the two collar pieces together and sew. I left the middle bottom section open for turning. Just make sure you leave an opening for turning. Then iron.

17. Cut two rectangles (as big as you want the bow tie to be) Pin and sew the two rectangle bow tie pieces together. Leave a space for turning! I trimmed the corners before I turned it right side out.  Then iron and stitch the center together to create the bow tie.
18. I sketched out the faces I wanted to use. Then I used a disappearing ink quilting pen to draw them onto the fabric. That type of pen is awesome. It makes it really easy to fix any mistakes. I used fabric paint for the faces. I like the Scribblers fabric paint. You can find it at Hobby Lobby for a $1 per bottle.

19. Cut out a rectangle of head fabric and round the corners. I wanted this piece to be about the same width as the doll face and just a little longer to accomodate the seam when stitched on and to leave a little to tuck into the collar on front when in use. Paint your "cracked" face onto this piece of fabric. *I didn't want this to fray, so I used some liquid fray block around the edge of the fabric. Make sure you spot check it on your fabric first to make sure that it dries clear.
20. You're almost done! Some last details: Cut a bit of ribbon (I like to use a polyester blend so that I can melt the edges of the ribbon to prevent fraying). I folded down the top of the collar to shorten it a bit and then sewed the ribbon to the top of the collar. Then I cut a small piece of ribbon and attached it around the middle of the bow tie.  Attach the bow tie to the collar. Now stitch the collar around your Humpty Dumpty. I left a little bit of a pocket at the top of the collar while stitching where I could tuck in the bottom of the alternate face.

21. I didn't picture it, but now you'll want to attach the "cracked" face. I stitched it onto the very top seam on my Humpty's head.  I only stitched across the top, so that I could pull the face forward and then pull it back when not in use. As I stitched, I tried to pull the fabric as flat as possible, so that it would lay mostly flat across the face. Then I trimmed away any excess fabric.
That's the long and short of it. This is my first sewing tutorial. So, I hope all of the steps make sense.
I originally wanted to add some rosy cheeks to my Humpty, then decided against it because I was in a rush and Jellybean wanted the doll right away. I did discover that fabric pastels will work well for that. I also neglected to add a little button detail to the spats. I'll have to get on that.

One final note, I don't have a clever way of hiding the "cracked" face when not in use. I thought about putting a little hat on top of his head to tuck it into or just attaching a bit of velcro to the back of his neck. If you come up with something, do let me know.

Be sure and let me know if you enjoyed this tutorial or if you have questions.

Have a Happy Day!

~MJ

Thursday, September 13, 2012

Humpty Dumpty Doll

Ever since Jellybean saw the Wiggles' song version of Humpty Dumpty, it has been one of her favorite songs. Every night before going to bed, I sing it to her and pretend to drop her when I sing the lyric, "Humpty Dumpty had a great faaaaalllll." Because she loves Humpty so much, I decided that I would make her one. Humpty Dumpty sat on a wall...
and Humpty Dumpty after his great faaaaalllll...
Poor Humpty! It's nice to know that after Humpty gets cracked, we can fix him again though.
Jellybean is in love. Come back tomorrow for the pattern and tutorial. It's been a true labor of love.

ETA: The pattern and tutorial is now available HERE!

Have a Happy Day!

~MJ

And for your viewing enjoyment: The Wiggles' Humpty Dumpty with Sam (why oh why did they let him go?!)


Sharing on:

Wednesday, September 5, 2012

Taking Care of Baby

Our neighbors were cleaning out their old toys and thought Jellybean would like their old doll highchair.
Feeding baby cookies...
Wash it down with juice...
and burp the baby.
Looks like she has this mothering thing down. 

Have a Happy Day!

~MJ

Tuesday, July 24, 2012

Scrap Paper Dolls

I love paper dolls, but the little tabs on their clothes? Not so much.  So, when I saw this idea from Giddy Giddy and then I saw these free Betsy McCall Paper Doll printables, I knew I had the materials to make paper doll magic. I'm calling these Scrap Paper Dolls.  All the classic charm of the classic paper doll, no little tabs, endless possibilities. 
I chose a few of the Betsy McCall forms, enlarged them and then printed them out in color. From there I sketched out the area that I wanted to cut out.
Then I took my trusty Martha Stewart crafts knife and went to work cutting. After the cutting was complete, I went to town cutting out all kinds of different patterns from any catalogues and magazines I had lying around. I tried laying the scraps out nicely and then, with the help of my kids, I discovered that scattering them at random led to even more interesting results.  Here are some of the combos we came up with:
All I can say is: Those are some stylin' kids.
I've become obsessed with clipping different patterns and textures from all of the catalogues we receive in the mail. I loved The Land of Nod catalogue. As you can see, the combinations are infinite. The price tag on this is also awesome: The cost of the card stock and color printing (if you don't have your own color printer) and that's it.
We're all sick over here, so smiles were difficult to come by.
Ditch all of your paper doll tabbed clothing and try out some Scrap Paper Dolls. Big thanks to Giddy Giddy and Betsy McCall for giving me some inspiration!

Have a Happy Day!

~MJ

Sharing this on:

Tip Junkie handmade projectsToday's Creative Blog
the Grant Life

Tuesday, June 5, 2012

Quiet Activity Idea: Handkerchief Folding

When I was a little girl, my mom would bring a simple white handkerchief to church and would fold it into a baby cradle in order to keep me entertained.  I loved it and would request it often.  As a child, it seemed like magic. Recently, I started carrying a bandana in my church bag and have been experimenting with some different ways to fold it.  Jellybean likes these handkerchief tricks as much as I did all those years ago.  It's a fantastic quiet activity for church or the doctor's office.  Here are two folding ideas that we've been enjoying.

The Bandana Bunny:
Start with a flat bandana and knot the top two corners. Bring the corners together and tie a big knot to create the bunny head and ears.
Knot the remaining corners into two little arms and bring the knot up in the back to make a little bunny tail.

Handkerchief Baby Cradle:
Fold handkerchief into a triangle. Roll each corner to the center, then fold in half. Take corner on very top and fold out and around to create the cradle.  Look, they're twins!
Jellybean likes to hold the cradle by each corner and rock it while singing, "Rock a bye, rock a bye."

Throw a bandana or a handkerchief in your bag and experiment with some folding of your own.  Here are a couple more ideas that I found out on the web.

Handkerchief Doll
Handkerchief Mouse (I couldn't figure this one out. I'm special like that, so maybe you can.)

Have a Happy Day!

~MJ

This post is participating in:
 Today's Creative BlogTip Junkie handmade projectsPhotobucket