Showing posts with label Thanksgiving. Show all posts

Monday, December 3, 2012

Squash Pie

I've had a goal this year to learn how to make some of the traditional holiday foods that I grew up with. I started off around Thanksgiving by making the rolls, fruit salad and apple pie that I love this time of year. I was a bit too tired to continue and make the last dish on my list: Squash pie.  I had frozen an extra pie crust for the purpose and finally got around to baking my pie this last weekend.

The end result? Delicious.

Many people are confused about squash pie. It's very similar to pumpkin, but in my opinion, worlds better. It is made with fresh banana squash which lends a nice texture and a much more mild and pleasant flavor than that of pumpkin. The majority of pumpkin pies I've had use canned pumpkin in the recipe. This often makes the pie too sweet and yet can't cover up the strong, "pumpkiny" after taste. I'm just not a fan.  My husband still prefers pumpkin (I guess it's what you grow up with), so I've promised to try one out next year, but this year I'm sticking with my favorite.  It helps that the kids have loved it.

Squash Pie

1 1/2 Cups Banana Squash (Steamed or baked until tender then mashed)
3/4 Cup Sugar
1/8 teaspoon Salt
2 Eggs (lightly beaten)
1 Tablespoon Melted Butter
1 Cup Rich Milk (Canned Evaporated Milk like Carnation)
1/2 teaspoon Cinnamon
1/2 teaspoon Nutmeg
1/4 teaspoon Allspice

1 pie shell (best pie crust recipe)

Pre-heat oven to 425 degrees F. Mix spices into sugar. Place all ingredients in a blender. Blend well. Fill unbaked shell (may be very full). If using frozen shells, make sure that they are well thawed before filling. Cover edge of shell with foil or an edge guard to protect from burning.

Bake at 425 degrees for 20 minutes. Reduce heat to 375 degrees and bake for 25-35 minutes until an inserted knife comes out clean.  

I've found that allowing it to rest for a day helps the flavor develop. So, make it a day ahead. Top with fresh whipped cream and enjoy!

Have a Happy Day!


Friday, November 23, 2012

All-American Apple Pie & Crust Recipe

I hope your Thanksgiving celebrations were a success. My family enjoyed the day very much. Black Friday is a little too much for me, so I'll be staying firmly at home today.
As promised, I wanted to share my family's apple pie recipe. It's a personal triumph for me that I tackled this recipe. It is one of those recipes that is strongly associated with my family's Thanksgivings and I was so pleased that it turned out just as it should. We brought my pie to D's family for the celebration yesterday, but fortunately, they aren't as in to fruit pies (and some are wary of "foreign kitchens") So, I was able to get my wish of having apple pie for breakfast today. Hooray!
In my opinion, this is a perfect apple pie.  Others I have tried fail in two areas. First, the crust is a problem. Most crusts are too dense or leave a weird film on the roof of your mouth. Second, the apples. Many recipes don't demand a tart baking apple. The end result is just too sweet and often mushy. What could be worse than a pie that is too sweet, mushy and leaves a film on the roof of your mouth? I guess a lot of people like that...
This recipe fixes all of those issues. The end result is a pie that is totally balanced between sweet and tart, apples that have a good bite to them and a crust that is tender and flaky. I hope you'll enjoy it as much as my family.
All-American Apple Pie

6-7 tart baking apples (6 cups) We use Granny Smith exclusively.
1 cup sugar (slightly rounded)
3 Tablespoons all-purpose flour
3/4 teaspoon cinnamon
Dash Nutmeg
Dash Salt

**1 Recipe Pie Crust (double-crust)
2 Tablespoons butter

Pare apples & slice thin (about 1/4 inch). Combine sugar, flour, spices, & salt; mix with apples.
Line 9 -inch pie plate with pastry; fill with apple mixture & dot with butter. Try to arrange the apples so that as they bake down, there won't be any holes created. Adjust top crust. Use a small amount of water to help seal bottom crust to top crust. Flute the edge and sprinkle with sugar, "for sparkle." With a sharp knife, slice several venting holes in the top of crust. Gently fold a strip of foil or pie tape around rim of crust, covering fluted edge. (This keeps juices in pie, guards against boil-over in oven and protects edge from over-browning.) Adjust oven rack to lower middle. Bake in hot oven, 425 degrees for 55-60 minutes or until top (and bottom) is brown* and apples are done. Place a sheet of foil on a lower rack if possible to catch any boil-over about 30 mins into baking.

*Browning the bottom of the crust can be tricky and depend on your oven. Slight adjustment in temperature, and location of pie may be necessary. The above settings worked for my gas oven, but a temperature of 400 degrees may be sufficient for an electric (exposed element) oven.

**Here's our favorite crust recipe. This is possibly the best crust there is. It is light, flaky yet tender and complements most pies very well.
Best Pie Crust Recipe
(yields 4 crusts)

3 cups flour
1 1/2 teaspoons salt
1 1/2 cups cold Crisco
   --Cut in crisco until pea sized
1/2-3/4 cups water (cold)
   --Sprinkle water into flour and fluff with fork until dough comes together into a damp ball (not wet). Press into a ball. Flour hands and divide into 4 small balls.

Roll out on a floured board to 1/8" thickness. Make sure to flour pin and board after each pass. Try not to over-work dough. Use crusts immediately or freeze with parchment in between crusts.

For ice-box pies bake at 400 degrees for 8-10 mins. Cool then fill.
For above apple pie, bake after filled.

If frozen: thaw well on counter before baking. (1 to 2 hours)
Enjoy and Have a Happy Day!

~MJ

Thursday, November 22, 2012

Happy Thanksgiving!

I hope you are having a fantastic holiday.  We are looking forward to spending our afternoon with D's family. I'm so thankful to be able to spend our Thanksgiving with family. Good food is an additional bonus.
I greatly miss my family's pies on the years that we are with D's family. So, I decided to bake my first apple pie to mark the occasion. It's a family recipe and turned out better than expected. I know that because we already tasted a slice (I couldn't wait). After tasting it, Buddy said, "I like apple pie! Can we share it with our friends?" I guess we'll be sharing it with the family sans one (or two) slices. (I have to make sure I have a slice for later.)
Now, if anyone asks if I can bake an apple pie, I'll tell them: "YES!" Come back tomorrow for the recipe.

Happy Thanksgiving! Have a Happy Day!

~MJ

Tuesday, November 20, 2012

Ridiculously Easy Fall Wreath

I realize that most people in the blog world have already completely skipped over Thanksgiving and are moving onto Christmas. But you know what? It's still a few days before Thanksgiving and I'm not ready to move on just yet.

Well, it's a good thing that I'm not ready to move on. It makes me feel justified in pulling out a Fall wreath idea from last year and posting it in lieu of anything more exciting.
Last year, I needed some quick mantel decor, so I purchased a bag of pine cones and whatever those pumpkin things are, cut out a cardboard form and then hot glued the whole thing together. How's that for a lazy wreath?  The best part is that I purchased the pinecones so close to Thanksgiving that they were 50% off. So the wreath cost me less than $5. Not bad for DIY decor that will be pulled out every year.

On another note, I fear that my blogging will not be as consistent over the next little while. My ultra favorite pregnancy symptom has reared its ugly head: Restless Leg Syndrome.  While my morning sickness seems to be diminishing, my restless legs are making my nights pretty difficult. I wake up in the mornings feeling like I've been running all night long. If only I were getting some health benefit... Here's to hoping that it will pass quickly and not last for the rest of the pregnancy.

Have a Happy Day!

~MJ

Monday, November 19, 2012

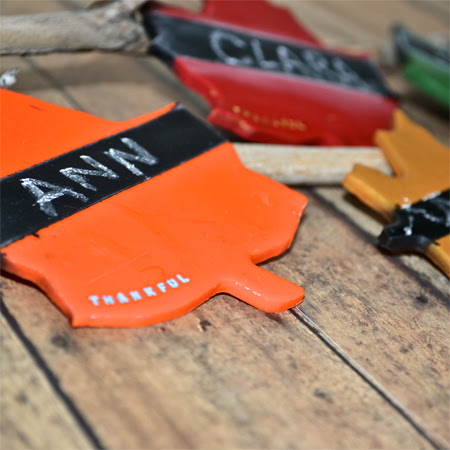
Thanksgiving Place Cards

When I was putting together my Fall Leaf Ornaments, I got thinking of different ways that I could work on the leaf theme with my clay.  My sister-in-law gave me some large leaf cookie cutters for my birthday, so I decided to work with those to create some Thanksgiving dinner place cards.
I just used the same process as I used with the ornaments and then spray painted a strip of chalkboard paint through the center.  These are easily re-useable from year to year, plus, your guests can wipe off their names and write something they are thankful for on their leaf during dinner.  I also thought that these could easily double as coasters.

We are looking forward to Thanksgiving here. I can't believe it's only a few days away. I guess it's time to get ready...

Have a Happy Day!

~MJ